Would anyone like to know more about…?

Just a quick dip-in from me, because it's way past midnight over here, so I don't have the time to listen to your recordings (but I will). Tomorrow, I will post my mix of Smoke On The Water. Before I do, It might help you to understand to what extent every mic on stage was picking up almost every other instrument and vocal. These are just the drum mics, before I gated them:
 
Well, I tried it and I do not detect any YouTube tomfoolery with compression.

It came out at around -12.5 LUFS without clipping any peaks.

I thought his video was enlightening. I just watched it 10 min. ago. It’s only good if you are using Reaper. Reaper is moving ahead by leaps and bounds by the way.
 
I thought his video was enlightening. I just watched it 10 min. ago. It’s only good if you are using Reaper. Reaper is moving ahead by leaps and bounds by the way.
I started off with Cakewalk many moons ago.

Used Steinberg CuBase for years, then switched to Reaper about 6 years ago.

Finally think I have a handle on how to get things done in ReaperDAW, however I still learn something new everyday.
 
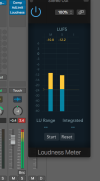
You only need to worry about LUFs if you're uploading to a streaming platform like Spotify. They are a bit fiddly, but as long and you have a loudness meter that displays LUF, and you follow the guidelines on the Spotify web site, you'll get there. Even if you don't follow the guidelines, Spotify's ingest system will alter your file to the correct spec. However, you probably don't want a bunch of algorithms altering your music, so it's always best if you can make the adjustments yourself.

One thing I cannot recommend highly enough on any mix is to put a compressor, then a limiter to catch the peak levels. This will make your mixes sound louder, more cohesive, and also make the task of getting those pesky LUFs lined up a lot easier.


LUFs.png
 
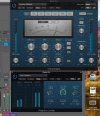
This is the sort of set-up I use on every mix (although I use my own presets, not Factory Default…). For most media (CD or whatever), I recommend you to aim for a peak level of -0.5dB. The limiter will help you achieve this without overshoots, while the compressor brings up the quieter elements, making the mix sound more detailed, as well as generally 'tighter'.

In recent years, it has been common for mix engineers to achieve maximum loudness by using the DAW's Normalize functions, often on a per-track basis, as well as the final stereo mix. I mostly avoid it, because the results can be so insistent that the relentless high levels start to get wearing on the ears. There's not a lot of point in fighting for the listener's attention if you then give them an experience they can't enjoy!

As you'll see, I apply compression at multiple stages – typically to most of the individual tracks – and well as the stereo bus at the output stage. This gives you the chance to control the dynamic range within the mix, and achieve an optimum output level, without the whole thing sounding flat and over-compressed.

About the biggest mistake you can make is to compress your music to within an inch of its life, then send your files to a mastering house. Just like food that's been overcooked, there's no way back for this particular dish. To put it more literally, once your thrown all the dynamic range away, there's little the mastering house can do to put it back.

Comp LTr.png
 
There's a slight-of-hand going on in that mix. The start and the end have a recording made from the back of the hall, to give it a live ambience and plenty of applause when the band finishes. But the ambient recording is entirely absent from the mix when the band is playing. This gave me a lot more control over the individual parts. I've alreay demonstrated how much spill there was from the rest of the band into the drum mics. Below is how it sounded after I gated every mic channel. The only reason you can hear anything other than drums Is there was only so much I could gate the Overheads before they sounded really artificial.

 
Uh-oh. I see SoundCloud is still processing the drum track. It's been doiing that for 30+ minutes. In my experience, if it hasn't finished in about three min utes, it never will, so Ill upload again and report.

BTW, ToneRoomTutorials was an account set up specifically for this thread. I wonder how long it will be before some flake messages me to say what a great track 'Vocals, no reverb' is and how they can help me to make it a hit. It's happened to me before!
 
You only need to worry about LUFs if you're uploading to a streaming platform like Spotify. They are a bit fiddly, but as long and you have a loudness meter that displays LUF, and you follow the guidelines on the Spotify web site, you'll get there. Even if you don't follow the guidelines, Spotify's ingest system will alter your file to the correct spec. However, you probably don't want a bunch of algorithms altering your music, so it's always best if you can make the adjustments yourself.

One thing I cannot recommend highly enough on any mix is to put a compressor, then a limiter to catch the peak levels. This will make your mixes sound louder, more cohesive, and also make the task of getting those pesky LUFs lined up a lot easier.
I'm currently using Ozone 11 on the main bus for that purpose.

Recent tracks I've done, I've been able to get away with LUFS -12.5 without having YouTube compress it any further (that I can tell).
 
I'm currently using Ozone 11 on the main bus for that purpose.

Recent tracks I've done, I've been able to get away with LUFS -12.5 without having YouTube compress it any further (that I can tell).
That's a very serious piece of kit you're using there. I've just seen the price. Gulp! https://www.izotope.com/en/shop/ozone-11-advanced/
I'm not saying it isn't worth every Cent, but that's a bit rich for my blood. ;)
 
  • Like
Reactions: PLX
That's a very serious piece of kit you're using there. I've just seen the price. Gulp! https://www.izotope.com/en/shop/ozone-11-advanced/
I'm not saying it isn't worth every Cent, but that's a bit rich for my blood. ;)
It will manage the limiting function on the main bus either statically or by "gain matching".

I don't like the gain matching because to me it sounds like the overall volume is going up and down during playback.
 
Hey, stardom beckons! SoundCloud reckons even the file it never finished processing is so good I should be paying to promote it. One day 'SOTW Drums WITH GATES' might actually chart! :rolleyes:

SoundCloud.jpg
 
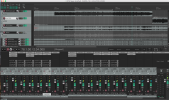
Before we get into details about mixing, plug-ins etc, let's talk about getting organised. By default, Reaper names each trach automatically to the name of the audio file on it. For this reason alone, it's worth making sure your file names are descriptive, and also preferably unique.

Reaper Organised.png
 
When it comes to the guitar solo, I've split the audio file between two tracks. Of course, I could have used mixer automation to change the level, as well as which plug-ins were active. Because I wanted to change multiple settings at that point, it was easier to just split the file (click on the WAV, move the green locater to the pont where the split should be and press S on the keyboard).

I've put all the drum tracks into a Folder, so that the level of all the drums can be controlled from a single fader. I normally start by getting a good drum mix, so after that, it's a lot more convenient to have all the drums on a single volume control. That doesn't mean I won't continue to tweak individual drum tracks as the mix progresses, but it makes things a lot easier when it comes to the final decisions about the volume of each instrument. (Page 97 of the current downloadable manual tells you how.)

Lastly, I clicked on the little arrow to the left of the Folder track (just to the left of the red Record Arm icon) to get the individual drum tracks to display smaller on screen. This meant I could drag up the height of the mixer until it showed the plug-ins on each track. This alone is a major productivity enhancer, because it saves you from going to individual FX dialogues when you want to disable a plug-in for comparison, or alter a particular plug-in's settings.
 
This video show my treatment of the kick (bass) drum. Could I have used the gate to get rid of even more of the band? Yes, but them it started to affect the sound of the drum itself, which is counter productive. The compressor evens out the level, while the EQ boosts the low and higher frequencies, and takes out some of the mid to give the bass guitar some space. I'll posts a video for the snare next.

 
  • Like
Reactions: PLX
Simon, here's a n00b question..

Why does it seem you have to pull (subtractive EQ) so much mid-frequency out of guitar tracks to make the final mix sound "professional" or even "correct".

:unsure:
 
Simon, here's a n00b question..

Why does it seem you have to pull (subtractive EQ) so much mid-frequency out of guitar tracks to make the final mix sound "professional" or even "correct".

:unsure:

I'm not sure I'd necessarily go along with that, Ben. In fact, I seem to remember on the sleeve notes of Katy Lied by Steely Dan, it specifically says that no EQ is used on the guitars. How are you recording your guitars? If you plug straight into an audio interface, it tends to rob the guitar of high end, making it rather lifeless, unless you put it through an amp sim. You're very welcome to post an example of your guitar recording without EQ, so I can hear what you're hearing.
 
  • Like
Reactions: PLX
Back
Top