Would anyone like to know more about…?

Lead Guitar
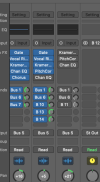
Tip – If you want to work on the lead guitar track, best to select that one, and not the muted channel to the left of it… :rolleyes: Once i'd got past that little mistake, I activated another Poulin amp plug-in, followed by a stereo delay and some EQ. I also kicked in the aux mixes on both guitar channels. These add some rooms simulation (Big Room on Bus 3) and some slapback echo (Bus 6). I've also got stereo delay on the lead guitar channel itself, of couse, but this is mainly to get extra L/R width during the solo. Come the final mix, I'll kill it for most of the song, so that the solo sounds bigger.

At the moment, I have the two guitar channels panned slightly left and right. When I do the final mix, I'll decide where they need to sit during the vocal sections, versus during the solo. With complete console and plug-in automation integrated into the DAW, there is no need to keep any element static if you don't want to.

I never did show what the EQ was doing but it's basically clearing out the unwanted frequencies to clean up the low end, and take a little 'fizz' out of the overdriven tone.

Next time, I'll start working on the vocals. That's going to be a fair amount of work, because what passes muster in a live venue isn't usually good enough to withstand repeated listening in people's homes. Believe me, there are a lot of 'live' albums where the vocals were redone in the studio. Let's just say, they're not always as 'Live & Dangerous' as they seem, and even the absolute cream of musicians aren't above re-recording the vocal parts when saying their Goodbyes.
 
Lead Guitar
Tip – If you want to work on the lead guitar track, best to select that one, and not the muted channel to the left of it… :rolleyes: Once i'd got past that little mistake, I activated another Poulin amp plug-in, followed by a stereo delay and some EQ. I also kicked in the aux mixes on both guitar channels. These add some rooms simulation (Big Room on Bus 3) and some slapback echo (Bus 6). I've also got stereo delay on the lead guitar channel itself, of couse, but this is mainly to get extra L/R width during the solo. Come the final mix, I'll kill it for most of the song, so that the solo sounds bigger.

At the moment, I have the two guitar channels panned slightly left and right. When I do the final mix, I'll decide where they need to sit during the vocal sections, versus during the solo. With complete console and plug-in automation integrated into the DAW, there is no need to keep any element static if you don't want to.

I never did show what the EQ was doing but it's basically clearing out the unwanted frequencies to clean up the low end, and take a little 'fizz' out of the overdriven tone.

Next time, I'll start working on the vocals. That's going to be a fair amount of work, because what passes muster in a live venue isn't usually good enough to withstand repeated listening in people's homes. Believe me, there are a lot of 'live' albums where the vocals were redone in the studio. Let's just say, they're not always as 'Live & Dangerous' as they seem, and even the absolute cream of musicians aren't above re-recording the vocal parts when saying their Goodbyes.
So you use plug ins on the amps rather than just the live amp recorded sound. Is this simply to make it sound bigger or was there an issue with the guitar sound?
The original rhythm did sound a bit weak.
 
I spose too, get the best live sound you can from the amp instead of hoping to fix it later. I do simply for my own purposes live. Our AnH board can record each channel direct out after gain control so it's easy to just hit record. That said, I try to get the best sound I can right off before it hits the mic. In the example above the rhythm did sound fairly anemic to me so I would have set it more ballsy which in turn helps the recording.
 
So you use plug ins on the amps rather than just the live amp recorded sound. Is this simply to make it sound bigger or was there an issue with the guitar sound?
The original rhythm did sound a bit weak.

I spose too, get the best live sound you can from the amp instead of hoping to fix it later. I do simply for my own purposes live. Our AnH board can record each channel direct out after gain control so it's easy to just hit record. That said, I try to get the best sound I can right off before it hits the mic. In the example above the rhythm did sound fairly anemic to me so I would have set it more ballsy which in turn helps the recording.

Yes, you've totally understood. I wasn't even in the same country when this gig was recorded. Although I had reservations from the start about how little amps were going to work on stage, I had to work with the hand I was dealt. The live sound from them was OK, thanks in no small part to the guy on the FoH desk.

But your ears can trick you into thinking a guitar sounds ballsy, just because it's loud. Once you hear it a moderate volume, you realise how much the guitars need beefing up to work on a recording. When I come to the final mix, I'll probably try a few more tricks to make the guitars sound bigger, without them being any more overdriven.
 
Yes, you've totally understood. I wasn't even in the same country when this gig was recorded. Although I had reservations from the start about how little amps were going to work on stage, I had to work with the hand I was dealt. The live sound from them was OK, thanks in no small part to the guy on the FoH desk.

But your ears can trick you into thinking a guitar sounds ballsy, just because it's loud. Once you hear it a moderate volume, you realise how much the guitars need beefing up to work on a recording. When I come to the final mix, I'll probably try a few more tricks to make the guitars sound bigger, without them being any more overdriven.
We don't play that loud, we really don't, and I often use combos but I play with way more gain and balls, as it were, and it fills it out better. Of course, micd thru FOH
 
This video on vocal treatments might not seem massively helpful on its own. I will provide notes, and further videos on the aux mix treatments, ASAP. It's been unexpectedly hot here in the UK, and very few of us have AC in our homes, so I'm working in a sauna here! I'm hoping things will chill a little in the next couple of days.

 
There are a number of challenges we face when mixing live vocals, that we probably wouldn't encounter when mixing a studio recording.

1. Bleed. As with all the other mics in this mix, the vocal mics pick up plenty from the drums and back-line.
2. Level changes. Some of these are caused by the singer going off-axis, glancing down at guitar neck, turning to emphasise cue point etc. But also, singers really belting it out, often get a lttle out of breath, or reach passages they can't execute as loud as the rest.
3. Pitch problems. At higher volumes a lot of people can slip off key somewhat – and it probably wasn't even obvious is the hall at the time.
4. The mic we get is… the mic we get. If we're lucky, it will be a good one, but we just have to play with the hand we've been dealt. Whatever, it's not going to be a large capsule condenser.
 
Disclaimer: There will be points in the video where you might find yourself thinking: "Hmmn… why did he do that?" If I don't mention it below, the most likely answer is: "I made a mistake!" Not only was the humidity through the roof, I was controlling the DAW using a trackpad, and sometimes I plain missed the mark. I could have edited the mistaked out, but that would have caused irritating jumps in the music, so I left them in.
 
Bleed
As with the other mics we need to clean up the vocal mics by minimising spill from other instruemnts. The first thing I did was check which mics were actually in use, and mute all the others. Quite a few that appeared to be in use actually weren't, but they were open and picking up a lot of back-line.

There were two vocal mics in use; one for the main line and one for the chorus harmonies. I put a gate on each of them which silenced the channels when no one was singing. I would normally also EQ out the lower frequencies that had no effect on the vocals, so that there was less spill when the mic channels were open. To my embarrassment, when the video was running, I discovered I'd forgotten to set the EQ! I'll fix that as part of the final mix.
 
Level
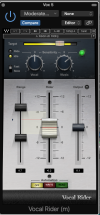
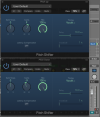
My weapon of choice for controlling fluctuating volume levels is the Waves Vocal Rider. Unlike compression, it's just an automated version of what you would do as an engineer if you had lightning-fast reaxctions: it rides the fader level up and down, within parameters you set, and creates no artifacts.

Vocal Rider.png

OK, it's a bit of a specialist tool, but bear in mind that you can run multiple instances on a live mix, and it's like having multiple hands on the faders! Right now, it's $39.99 Vocal Rider Plugin - Waves Audio but Waves' prices seem to change almost daily, so if you sit it out until they're having a really quiet day, you might get lucky.
 
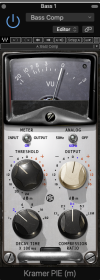
With the Vocal Riders taking care of level, we can set the Kramer PIE compressors to add a bit of studio polish, rather than having to over-compress just to get our levels under control. Idle boast time: the very first recording in a commercial studio I played on was later mixed at the legendary PYE studios, by a top engineer who also mixed hits for the Kinks, and other big acts of the day. One of the competitive advatages of PYE Studios was the excellent gear it built in-house, such as a compressor, of which the Waves Kramer PIE is an emulation.

Kramer PIE.png
 
Last edited:
Pitch
This is a slightly delicate matter, because if you do a lot of pitch correction – to the point it's supr-obvious – you might hurt someone's feelings. Listening repeatedly to SOTW, I was convinced that the singer had given it his best shot during the rehearsals earlier that day, and now needed a bit of a helping hand.

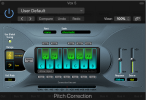
There are essentially two types of pitch correction system. The one I used is a real-time processor and comes with Logic Pro. It's pretty easy to set, and you can either use it to push the note centres to the nearest 'real' pitch, or to the nearest note in a specific musical scale. In this instance, I left it set to chromatic, because the singer was doing a pretty good job, so the correction was minimal.

Pitch Correction.png
 
The other type of pitch correction – which most pro would use in a 'post production' context – uses an editing environment in which individual notes can be corrected for pitch, as well as other characteristics, like amount of vibrato. I'm not going to dive into them here, because they merit in-depth tutorials of their own. However, for the curious, this is the tool I prefer for the task.

 
When you look at the post-fade aux sends, you're probably thinking: "That's just a rediculous amount of sends! Why would anyone add that many effects?" You'd be right, and I'm not really advocating using them all. It will take another video to explain them all, but I'll concentrate here on the role of two pitch shifters (one up and one down), which are there to fatten the lead vocal for a more 'rock' sound.

Screenshot 2024-08-03 at 19.14.34.png
 
When you watch the video, you'll discover that – when I switch them in – they actually make the vocal quieter. That's because I've over-cooked it to demonstrate. About 4 Cents is probably more like it, as I'll show in a later video.

Screenshot 2024-08-03 at 19.20.38.png

If I don't go and cook dinner now I'll be in trouble…
 
I'll try to post a new video in the next couple of days. Mesnwhile, let's take another look at the picture above. The eagle-eyed amongst you will notice that to the right is a bus channel that – in itself – has a send to Bus 3. To answer your first question: Yes, it is possible to do that. Your second question is probably: Why would you?

OK, here goes…
 
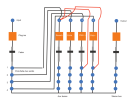
Here is a basic diagram of the signal-flow through the vocal channel to the main aux mixes, and on to the main stereo bus. Note the four aux mixes go to Reverb, Echo, Pitch up and Pitch down, while the main output of the channel routes to the stereo bus. This means the vocal gets some nice reverb (aux 1) and delay (aux 2), as well as being 'fattened up' by the pitch + (aux 3) and pitch - (aux 4).

That's great, but if you follow the black lines indicating the signal paths, you'll probably realise that the pitch-shifted versions of the vocal go to the stereo bus totally 'dry'. In other words, they have no reverb or echo on them. In this simplified diagram, I've used red lines to show how buses 3 and 4 can be fed to bus 1 to add reverb. In reality, I'm likely to want to add eacho (bus 2) as well, but that would make for a complicated diagram, so I left those lines out.

Aux routing.png
 
OK, here's an exploration of some of the effects we could apply to the vocals. Notice I said 'could', because a couple of these are not very effective, and I'd never want them in a final mix. The slapback echo and the pitch up/down strategies clearly don't work very well, so I'll be posting better examples of both those ideas.

 
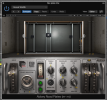
The first thing you'll notice is the lead vocal track has been gated so severely, it sounds very unnatural. It's only when we give the vocal some 'air' by introducing ambient room reflections (reverb) that it starts to sound more natural. I cannot over emphasise how much more effective a short, tight decay time is, compared to some massive reverb time that puts the singer in a swimming pool. If you listen to your favourite artists, great washes of reverb went out in the 1960s.

7 Room reflections.png
 
Back
Top