Would anyone like to know more about…?

Right, let's get back to this set-up, and look at the individual plug-in settings.
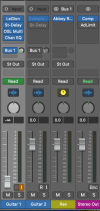
Channels.png

The amp is one of the free Poulin plug-ins I mentioned before. You can get them here: Lepou I did absolutely nothing to the settings on this! With hindsight, I suppose I could have switched the quality to High, but I quite like the slightly gritty sound it makes set to Low.
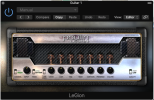
Anp.png

Next up is the Logic Stereo Delay. There are plenty of other stereo delays out there, and they all do much the same thing. There are great way to get an instruments to occupy a wider area of the stereo field, and also to create some left/right movement by having a different note value each side. (It's worth bearing in mind that those values will only be accurate if the tempo of the track is set correctly. If you just load a jam track and leave the BPM at your DAWs default, the actual note values created by the delay could be pretty much anything.

It's worth noting that, although I've got the level on the delays quite high, I've also put in a lot of high cut. This makes the delays get progressively darker as they repleats, which sounds more natural and less obtrusive.
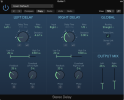
Delay.png
 
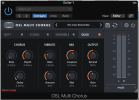
The Oblivion Sound Labs Multi Chorus is up next. With hindsight, I've probably got too much wobble going on there, but it's another way of getting more width and movement into your instruments. I've just noticed it says it's in Demo Mode. I'll have to check that out, because the developer gave me a licence key as a reward for beta-testing the plugin. I've also got the OSL Hex Drum plug-in, which I bought because it sounds just like the original Simmons electronic drum kits, but is more versatile.

Chorus.png

The EQ is doing precisely nothing, and I should have taken it out of the chain, because it was taking up processor power without actually adding anything.

EQ.png

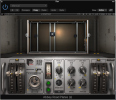
Sitting on Aux Bus 1 was the Waves Abbey Road Plates, which I left set to Default, because I think it sounds really good. The next topic I'm going to tackle is what Aux mixes can be used for, and what a bus is, because they are both important when mixing.

Plates.png
 
Let's look at Aux (Auxillary) mixes and Buses (usually rendered Busses in North America for reasons I have never known).

Aux mixes are just like the main stereo mix, but route somewhere else. On old-style analogue desks, all the aux mixes had their own output sockets on the back of the unit. The aux mixes used for effects would be connected to various units in the rack, then fed back via more cables to the appropriate 'aux returns' on the back of the desk. (It was a few years before I realised than an aux input is just a line-level input that you could use for a CD player etc if you wanted to…)

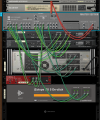
In the DAW environment, this routing arrangement still exists, but there's no one inside your computer rushing around connecting cables to hardware. Instead, it's all done in software. As a result, different DAW developers have gone about showing the routing in different ways. Although it now uses an 'auto-routing' system by default, Propellor Head's Reason (Reason, Logic, geddit?) allows you to get round the back of the effects rack and manually plug the gear up. Although that's quite a fun way to work for those of us who rember doing exactly thar in hardware, there are a lot of musicians who've never worked that way, which is probably why there's less emphasis on the 'back of the rack' approach in later versions of Reason.

Reason Rack.png
 
Before we get into creating aux mixes, it might be a good idea if we look at the difference between a pre-fade and post-fade aux, because they are used for different things. The two terms refer to the fader at the bottom of the channel strip. Pre-fade mixes leave the circuit before the main channel faders. This means that, no matter what we do to the main mix going to the stereo outputs, the aux mix will stay just the way we left it.

Pre-fade mixes are therefore ideal for monitoring, whether on stage or in the studio. Imagine if the engineer absent mindedly created a post-fade mix for the singer's headphone. The singer is concentrating on the backing track and their vocal performance, when they are suddenly distracted by the engineer making tweaks and changes to the main mix! Not exactly a performance enhancer.
 
Post fade aux mixes are affected by changes to the main channel faders, which is what we want for effects. Here's why…

When you set, say, the amount of reverb on the lead vocal, that's how you want it to stay. While you're perfectly entitled to change your mind abut the amount of vocal going to the reverb, what you don't want is the wet/dry ratio changes just because you altered the level of the vocal track. Let's say for some reason you fade the vocal track to nothing in one section of the song. If the effects mix was pre-fare, you still be left with the singer awash with ghostly reverb, even though the channel fader was all the way down!

So how do you create a new aux mix? I'm afraid that varies from DAW to DAW, so the fastest way to answer your question is to dive into the manual or go on YouTube in search of instructional videos.

If you're a Reaper used, I'd highly recommend you find 15 minutes in your life to watch this video, then hit the Subscribe button! (If you're short on time right now, he covers effects routing somewhere past the four minute point.

 
So what's a bus? Some of you might say: "Well it's a thing a lot of people can jump on and end up at the same place." Exactly! That's why it's called a bus, because if you your signals to the right bus, they'll end up in the right place. You send all your drums to one bus, then send that bus to the main stereo bus etc etc. I was informed right near the start of this thread that you can achieve the same thinbg in Reaper with Folders. Actually, you ca do it with buses too in Reaper. Here's a video all about it>

 
At this point, you may be wondering: "Why has he talked about aux mixes, and about buses, when they're two separate things?" I'll cut to the chase.

The same way as the cables from the effects went to the Aux Ins on the back of an analogue desk, the effects mixes you create have to rout back to somewhere. That somewhere is a bus, and that's where your plug-in will go. As I've pointed out before, multiple instances of the same plug-in take up resources on your computer and are time-comsuming to set up. If all you want is the same, say reverb, but you want different amounts on different parts an aux mix routed to a bus containing the reverb plug-in is the way to go.

Now all you have to do is vary the aux levels on the relevant tracks and your mix starts to come together. Maybe you've found yourself a reverb setting that suits vocals and acoustic guitars. You'll probably want to keep your lead vocal fairly dry, so it's 'in the listener's face'. Backing vocals usuaklly benefit from more reverb. Not only does this help them blend, it places them further back on the sound stage.

So far, you've probably thought mostly about mixing in terms of levels and left-to-right. It's also important to think about front-to-back. More reverb equates to futher back, while less reverb brings parts further forward.
 
TIP: The mistake I hear most often from less experienced mixers is chosing vocal reverbs that have too long a decay time and/or making the vocal overly wet by putting too much reverb on. If you take a good listen to your favourite singers, you may be surprised how often their vocies are dry, with little or no obvious reverb. There are other ways go getting big vocal sounds than lashing on the sort of reverb even a nightclub singer might blush at!
 
So what's a bus? Some of you might say: "Well it's a thing a lot of people can jump on and end up at the same place." Exactly! That's why it's called a bus, because if you your signals to the right bus, they'll end up in the right place. You send all your drums to one bus, then send that bus to the main stereo bus etc etc. I was informed right near the start of this thread that you can achieve the same thinbg in Reaper with Folders. Actually, you ca do it with buses too in Reaper. Here's a video all about it>

Nice! I haven’t seen any of his videos before(that I can recall), but then I haven’t been looking for much for a long time. Pretty straightforward delivery, and easy to follow…without the New York version of Captain Kirk ;) . There are quite a few ways of achieving most anything in Reaper. I habitually drag from the track send/receive rack in the mixer, to the send/receive in the destination bus, for example. My habit with effects on folder tracks is to generally stick to insert effects (compression, eq etc), and I may create a bus for that folder and/or other tracks/folders for time based effects(reverb/delay etc). Not hard and fast rules, just my habits left over from live sound etc.
 
TIP: The mistake I hear most often from less experienced mixers is chosing vocal reverbs that have too long a decay time and/or making the vocal overly wet by putting too much reverb on. If you take a good listen to your favourite singers, you may be surprised how often their vocies are dry, with little or no obvious reverb. There are other ways go getting big vocal sounds than lashing on the sort of reverb even a nightclub singer might blush at!
Simon,
if you have time, talk about using compression to record individual tracks...and mix down for mastering.
a lot of these guys want to know about keeping levels more constant.

I talked about multi band compression being used as the broadcast standard, to produce constant output levels.
But I only just touched upon that briefly; did not go into a lot of detail.

I think home recording in a lot of cases lacks the proper use of compression, and a lot of these home recorders want to learn how to apply it to obtain a more professional sounding final result.
 
Nice! I haven’t seen any of his videos before(that I can recall), but then I haven’t been looking for much for a long time. Pretty straightforward delivery, and easy to follow…without the New York version of Captain Kirk ;) . There are quite a few ways of achieving most anything in Reaper. I habitually drag from the track send/receive rack in the mixer, to the send/receive in the destination bus, for example. My habit with effects on folder tracks is to generally stick to insert effects (compression, eq etc), and I may create a bus for that folder and/or other tracks/folders for time based effects(reverb/delay etc). Not hard and fast rules, just my habits left over from live sound etc.

I very much welcome your input, because you clearly have a lot more experience with Reaper than me. As well as enriching this thread, you're teaching me a thing or two as well!
 
Simon,
if you have time, talk about using compression to record individual tracks...and mix down for mastering.
a lot of these guys want to know about keeping levels more constant.

I talked about multi band compression being used as the broadcast standard, to produce constant output levels.
But I only just touched upon that briefly; did not go into a lot of detail.

I think home recording in a lot of cases lacks the proper use of compression, and a lot of these home recorders want to learn how to apply it to obtain a more professional sounding final result.

More than happy to oblige. In fact, I can start on that tomorrow.

Until then here's a compression-related story from 1974, which was the first time I entered a commercial recording studio as a musician. The studio was in Denmark Street, London, which was very much the heart of all the musical instrument shops, a lot of the record labels, publishing companies, and some of the recording studios that served them. When you're a 17-year-old bass player, this is exciting stuff.

One of our guitarists had a father who was a professional sound recording engineer. He had impressed on his son that the whole recording production chain, from laying the tracks to pressing the vinyl was one of progressively reducing the dynamic range through the use of compressors. By the time music finally hit the radio waves, or landed on someone's turntable, it would have been through many such stages. These were all aimed at squeezing the dynamic range of live musicians into the limited capabilities of broadcast transmitters, vinyl records and domestic play-out systems.

With these heady ideas very much to the forefront on my mind, I walked into a Control Room for the very first time. The engineer for our session (who went on to work with some impressive artists) strode towards a massive brushed metal panel, and proceeded to turn some rather large rotary controls. "Are those compressors?" I innocently enquited. "No!" he said, with a laugh.

That's when I realised the lights on the studio floor were getting brighter… :rolleyes:
 
Good question. Exactly what the compressor does depends on the specific settings you use. In order to catch the initial transient you'll need a fast attack time, whereas if you want to increase the sustain of notes (or the length of time the drums ring out), you'll need a slower release. About the only way to learn this stuff is to experiment and hear for yourself what the difference is.

No compressor sounds a lot better on live drums than an inapproriately set compressor, who I'd want to be certain I was making things better before I used it.
Ah Ok. My slow friend thanks you. It may be of no real benefit for live sound on drums then, as long as I get that nice smack of the toms. Any ringing afterwards is usually not wanted IMO.
 
Just a quick promo for the next stage of this. Back in 2018, there was a practice session in Belgium, which served as a rehearsal for a live concert that night. Some of the musicians were only 10 or 12-years-old. The Front-of-House crew were happy to make a 16-track recording straight off the board, but didn't have time to mix it. So I was send the multitrack files, and all the raw video footage. I mixed it, then edited up the video.

I'll pick out one or two of the numbers, then take you step-by-step through what I did to get the levels under control and make acceptable mixes for something like 30 songs, all with different line-ups!

 
One of the reasons I thought this material would be helpful to others is precisely because these aren't pro players (I think the drummer was 11-years-old at the time), there was only one rehearsal, and all the backline was made up from very small combo amps that weren't really up to the job. Was it challenging to mix? Er… yeah!

 
Thanks @simoncroft for posting all this information. I hope to have personal time again at the end of the summer, along with a new computer. Then I can re-read all the posts and try to do some home demo tracks. In the meantime, I'll be here lurking and eagerly reading everything.

My only recording experience is in professional studios, trying to make a profession product. For a long time I felt that DIY too often sounded DUH, and didn't really want to go down that road. Especially if it was to be for sale or submitted for airplay. Now, I'd like to start doing some home recording to make demos to have others listen to for general feedback or listening, auditions, or learning and/or modifying arrangements.
 
This is a link to Smoke On The Water, with no processing apart from a limiter on the stereo bus to prevent overloads.

As you can hear, it ain't bad, but it could cretainly be improved in terms of the mix. Fortunately, I was sent 24 tracks from the Front of House desk, so I had plenty to work with.

All 24 tracks.png

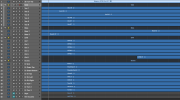
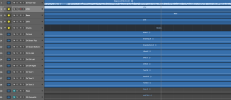
To organise the job, I grouped individual tracks iinto Logic Stacks. TBH, if you don't do this on a project this large, you're making life difficult for yourself! I've opened the Drum stack, just so you can see how messy things would get trying to deal with 24 tracks without some sort of structure.

SOTW Arrange.png

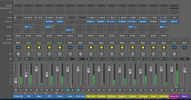
As you can see, this also has a beneficial effect on the Mixer too. You'll notice abaout half the screen is taken up with effects buses. The project contains the entire concert, so I need to have appropriate treatments available for everything from youngsters with ukes to full-blown rock.

SOTW Mix.png
 
Last edited:
Just to let you know, I haven't stopped work on this thread, but it's become obvious to me that the only way to explain a mix like this is to record a video. Unless you can see and hear in real-time what I'm doing, and why, it might not mean much to anyone but me. It's been a while since I've made a video this way. While I hope to get everything set-up on my computer tonight to support screen video and audio recording, I'll have to remember how to set everything up. Then, I'll edit out all the boring bits!

Just to give you a bit more info on the screen-shot above, 'St from Vid', is actually the stereo recording from a camcorder quite a long way back into the venue. It was useful for creating the audio mixes for the videos, because it gave a more ambient, 'live' feel when I added some of that in.

But for this thread, I won't be working sound-to-picture, so my objective is going to be to make the live recording sound as close to studio recording as I can, without making it a total work of fiction. So, studio-grade processing, yes. Editing minor fluffs out of individual player's performances, no. Although I'll use some pitch correction as part of the overall vocal enhancement, I won't go as far as trying to fix minor timing issues.

Right, back to "How the Hell did I have all this set up last time"…
 
Back
Top