Understanding and using live sound equipment

We were fortunate enough to have 4 aux mixes for monitors for years and now with the new digital board can have as many as we wish, within reason. 5 monitor feeds, 1 for FOH subs, 1 for drummer's sub, etc. About time!
Of course, many a venue with house PA gives only 1 or 2 monitor mixes so the singer must learn to share.
Cheers for this.

Thank you for your input. In many ways, digital is 'the great leveller', because running five different monitor mixes would have seemed an impossible luxury for most of us who were using analog(ue) mixing desks. Apart from any other factors, the more aux sends you added to a channel strip, the longer it became! There came a point where you had to have a separate monitor desk, which was more the 'concert touring' level of rig.

Personally, I can live with two monitor mixes more than I can FoH guys in clubs, who are simply too lazy to move the stage monitors to suit the lineup of the band, meaning a power trio and an eight-piece outfit with brass end up with the same wedges, littered at meaningless positions on the stage. :confused::(:mad:
 
Show me assigned!

System overview: The evolution of the mixing console (more about routing and grouping)


Although ‘routing and grouping’ sounds like something from a Fifties song (“C’mon everybody, we’re a-routing and a-grouping…”), it’s an important area if you are going to get a handle on how signals are moved and managed on a mixing console.

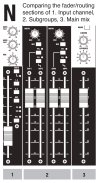
With that aim, we’re going to use Diagram N as our reference. It shows the mic/line input (1), subgroup, or group (2) and main mix output (3) strips from a Soundcraft GB2 console. Other mixing systems may not be identical, but the fundamental ideas can be transferred to almost any desk. It’s the areas marked in black we’re concerned with today.

Alongside the fader on the input channel there are a number of push buttons. The first of these is marked Mute and has a LED next to it to show when it is in use. There are a number of instances where the Mute function can be useful, but for now let’s just say it “does what it says on the tin”.

Our main focus today is the group of three buttons mare 1-2, 3-4 and Mix. As you’ve probably worked out, these buttons route the input channel to three possible destinations. These are (sub) Group 1&2, Group 3&4 and the main stereo output, also referred to as Mix. In all instances, the Pan control determines how much of the signal from that channel goes to the Left/Odd-numbered outputs and how much to the Right/even-numbered outputs. The main significance of this is that pairs of subgroups can contain a complete mix stereo. We’ll look at this again when we come to the Width control on the subgroups.

Also on the input channel are LEDS for Peak level (PK) and Signal Present (SIG). These are useful aids when initially setting the input levels. The PK LED will also warn of overloading and help to identify the source of feedback.

Group channels on this particular console have a Width control. The Width control is basically two pan controls in one, so when it’s turned all the way clockwise, the effect is the same as having one group panned hard left and the other hard right, which is why the position is marked Stereo. With the Width turned all the way counter-clockwise, it’s the same as two pan controls pointing dead center, which is why it’s marked Mono in this position.

This is by no means a standard inclusion but it is quite useful, as this example will hopefully show you. Let’s say you’ve decided to send all the drum mics to Groups 1-2 and you’ve already panned the individual channels to reflect the position of each drum on stage. There’s a good chance that by the time this mix comes out of the main rig, it’s way too wide. By that I mean, when the drummer goes round the toms, the spread is about 20ft, whereas if you were standing in front of the kit, the actual spread would be about 3ft. Reducing the Width control until the stereo field is more realistic is a lot easier than adjusting all the individual channels (which is basically the whole point of subgroups!).

The three buttons on the Group channel – Mix and two PFLs – are relatively straightforward but you might want to refer to the box I’ve called ‘What’s PFL again?’ As the name implies, the Mix button routes a pair of Group channels to the main mix.

You might wonder why the groups are not simply hard-wired to the Mix output. After all, if you can’t hear them in the main mix, what use are they? There are a few reasons why you might not want your subgroups to go to the main mix. One of these is if you are also making a multitrack recording and want to use the group faders to set the optimum record levels, without having to consider what that does for the main Front of House mix.

The main Mix fader (on some desks you’ll find two for Left and Right) has no associated routing or PFL because the signal goes straight to the main rig.

** What’s PFL again? ************
We’ve touched on the function of PFL before, but let’s look at it in slightly more depth. The Pre Fade Listen button allows the engineer to hear a channel in isolation. This can be useful when, for instance, trying to EQ just the snare drum. You could ask the drummer to keep playing only the snare but using the PFL makes it easy to hear the snare, while keeping it in the context of how the drummer will actually play the whole kit during the set.

Up-market mixing consoles have a related function called Solo. This is superior to PFL in that Solo allows the engineer to hear a channel with the pan setting and any effects in place (hence the control is sometimes referred to as ‘Solo in place’). While Solo is generally more useful than PFL, it is also more complicated and expensive to engineer on an analogue console. On digital desks, the engineering issues are less relevant from a design perspective, because there is no difference in component costs between PFL and Solo.

AFL stands for After Fade Listen and is functionally very similar to PFL but is generally found on the Master section of the mixer, where it permits monitoring of Aux mixes and other functions.
*********************************

In the next post, I’ll include a short section on The Matrix, which is nothing like as exciting as the name might imply. In fact you can live a long and fulfilling life without ever using it, but I don’t want anyone to think I’ve glossed over a few controls because I don’t know what they do either!

We should also take a good look at all the sockets provided on a mixing console. There are a lot of them and understanding what they are for is a big part of getting the most from a console.

After that, let’s consider ourselves done with mixing consoles for a while and turn our attention to the Sound Reinforcement gear we find on stage: microphones, DI boxes and the stage box.
DiagN_routingInSubMix.jpg
 
My favorite part of any pro sound system is the 1/3 octave EQ. (and I prefer an analog cut-only passive EQ)
This allows me to flatten frequency response in (essentially) any room / any stage, eliminating ringing squealing feedback "hot spots,"------- what I would consider a base line starting point for a live mix.

There are digital EQs, and there are automatic feedback control systems,
but I personally would rather not use them.

There are those who say that analog / passive 1/3 octave EQ is obsolete, but I personally, would not agree with that.
I like an EQ that I can grab hands on to, at any instant.

But regardless if you are an analog or digital person,
control elimination of house and stage ringing squealing feed back is established should be accomplished first, before using the PA system with a live band.
 
This short post isn’t just about the Matrix, it’s about all sorts of disparate stuff you find on the Master section of bigger mixing consoles. It’s all useful stuff but looks kinda intimidating if you’re used to working with smaller desks that don’t have these features.

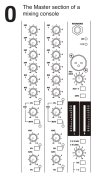
Diagram O is what we’re working with today. The first two channel strips are part of the Group outputs labeled 2 in Diagram N in my previous post. The first thing to understand is that the remainder of these channels strips shown in Diagram O has nothing to do with the function of the group faders below them.

Sometimes, when designing a mixing console, you have to put things where there is space. That’s why I described this section of the mixer as ‘disparate’. Perhaps ‘administration and communications’ might be a better way to describe what goes on in this particular part of the desk.

The first seven rotary controls to both group fader strips are almost identical, and they are essentially two separate 6-into1 mixers. What makes these little mixers special is that their inputs are derived from the four (sub)group outputs and the main mix outputs. If you look at the markings next to the controls, you’ll see that this is the case. It’s only when you get to the seventh rotary that they are different: the one on the left is marked MTX 1, while the one on the right is marked MTX 2.

This is because the first Matrix mix goes the MTX 1 output on the back of the console, while the second goes to MTX 2. But what you use these mixes for? Well, one simple scenario is that you use them instead of, or in addition to, the monitor mixes you could create using the Aux mixes. Assuming Groups 1-2 contain the drum mix, while Groups 3-4 contain the vocal mix, there is the scope for two monitor mixes that have more drums and/or more vocals than the Front of House mix. That’s going to keep a lot of bands happy, and makes life very simple for the sound engineer.

There are other uses for Matrix mixes, depending on the kind of production, and the demands of the venue. For now, it’s probably enough that we grasp what the controls on the console do. Note that the Matrix mixes are provided with AFL and Mute buttons.

Below these, we have the master levels for the various Aux mixes, again with AFL monitor buttons. In the case of pre fade mixes, these levels will be the master volumes for on-stage monitor mixes, while the post fade mix levels will control the signal level going to outboard effects such as reverbs.

Moving to the Mix channel strip to the right of Diagram O, you’ll see that there are two sockets. One of these is for headphones, the output to which is mainly determined by whether or not any PFL/AFL buttons are engaged.

The other socket is a 3-pin XLR for a Talkback microphone. In most performance situations, the talkback mic will be used as a way for the Front of House engineer to communicate with the stage. That is the reason for the Aux 1-4 button just below the Talkback volume control.

The ability to send the Talkback mic to the Group outputs is probably more useful in theaters, but there is one (possibly unique) use I swear is true. There used to be a very good band in the UK called The Sensible Jerseys. Their Front of House engineer was also a harmony vocalist on some of their numbers. Presumably, he routed Talkback to Groups in order to be part of the mix. Whatever, it was very strange to see the guy behind the desk joining in.

Also in the Master section, you’ll find the main meters. Typically, you’ll also get a way to add a stereo player (CD, MP3 etc) for music between sets.

“What are all these sockets for” next time!DiagO_masterSection.jpg
 
My favorite part of any pro sound system is the 1/3 octave EQ. (and I prefer an analog cut-only passive EQ)
This allows me to flatten frequency response in (essentially) any room / any stage, eliminating ringing squealing feedback "hot spots,"------- what I would consider a base line starting point for a live mix.

There are digital EQs, and there are automatic feedback control systems,
but I personally would rather not use them.

There are those who say that analog / passive 1/3 octave EQ is obsolete, but I personally, would not agree with that.
I like an EQ that I can grab hands on to, at any instant.

But regardless if you are an analog or digital person,
control elimination of house and stage ringing squealing feed back is established should be accomplished first, before using the PA system with a live band.
I agree that tuning the rig to the room is the best starting point, if you have the time and gear to do that. I also agree that automatic feedback suppression systems can cause more problems than they solve. In fact, if you've done the tuning stage correctly, you really don't need them.
 
It's sockets to me!

The Function of the Inputs/Outputs on a Mixing Console


Most people probably think the same thing I did when I looked round the back of a full-scale mixing console for the first time: “Oh no! This looks really complicated!” What I didn’t realize until I got to grips with all these connection was how many creative possibilities they could open up. Live multitrack recording, using a desk that doesn’t look up to the job is just one of the possibilities.

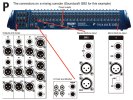
Fortunately, just like the channels strips on a console, the connectors on the back are mostly duplication. Take a look at Diagram P and you’ll see that the whole console can be reduced to very few component parts. The best way to explain what the sockets do (or more correctly, the things you can use them for) is to start at the inputs on the right and work our way through until we get to the outputs.

****** What is a TRS jack?*********
TRS stands for Tip, Ring, Sleeve and a jack plug of this type has a number of applications. The most common is on stereo headphones, where the Tip carries the Left channel, the Ring carries the Right and the Sleeve is the Common. On pro audio gear, TRS jacks are frequently used for a couple of reasons. One is to allow line level connections to be balanced (that is to say, the audio phase and antiphase connections are kept separate from the Ground or Screen, as shown in Diagram G in an earlier post). The other common use is to create send-and-return Inserts that function as both input and output. Both of these functions could be performed using XLRs, but XLR connectors are more expensive and take up more room than jacks. In addition, using a different connector for the Mic and Line level inputs makes it impossible to mix them up.
***************************

Mono Mic/Line input channels
These take up the majority of the real estate, so anything you learn reading while this section can be used over and over. The socket you’ll be using most often is the 3-pin XLR Mic input. These provide for noise-cancelling ‘balanced’ connection, and also allow 48V Phantom Power to be fed to condenser mics. (Phantom power can also be used on active DI boxes. There is no problem with using the Mic input for this purpose, but the Gain control will typically need to be set lower.)

Next to this is the Line input. Although this goes through the same preamp section on the desk as the Mic input, it is more typically used for sources such as electronic keyboards, submixers and outboard processors. Another common inclusion is an Insert. This sends a signal from the preamp stage of the mixer on the Tip of a TRS jack and returns it on the Ring connection. A typical use for this would be to include a compressor, or other dynamic device that is only required on that channel.

NB – Occasionally a TRS insert on a mixing console is used in conjunction with an outboard device that is also fitted with a TRS jack for send/return. It is worth bearing in mind that the cable must be reverse wired, so that the send (output) of the mixer goes to the return (input) of the device, while the send (output) of the device goes to the return (input) of the console.

The Direct Output is again balanced on a TRS jack and has an associated Pre switch. Together they are a very useful inclusion if you need to feed either a multitrack recorder, or a separate monitor mixing console. By default, the Direct Output is post fader, meaning its level is controlled by the channel fader. You would probably consider working this way if your intention was to lay tracks to a recorder and there was no Front of House mix required. Conversely, if your main need is to create a Front of House mix, while feeding a multitrack recorder or monitor mixer at the same time, pressing the Pre button switches the output to pre insert point. This means that once the input gain is set, the Direct output will not be altered by any changes to the main mix.

One of the cool things about taking direct input channels to a multitrack is that you can feed a lot more separate recording tracks than you have subgroups. To out it another way, there are plenty of desks out there that have, say, 16 input channels. But if you want to buy a desk with 16 group outputs, you are in a very different price category. So 'direct outs' give you a lot of recording power, with having to use a big-budget desk. But what if your otherwise perfectly functional 16 channel desk doesn’t actually have direct outs? That’s where you can benefit from some creative thinking about how connections can be made.

A lot of desks that don’t have direct outs are equipped with insert points. If you wire a TRS jack so that the Tip and Ring are shorted together, you can take that as your signal and the Sleeve remains as shield. It isn’t balanced, and the quality may not be quite as good as a dedicated Direct Out but it works.

Stereo Mic/Line input channels
No prizes for guessing the main difference between these and the Mono channels! Yep, on these channels there are Left/Right Mic inputs and another two for Line inputs. The Stereo channels are useful for several different types of input source, including sub-mixes from DJ decks or keyboard rigs, stereo mics on drum overheads and other percussion, and external effects returns. In short, any kind of source where it makes more sense to deal with the incoming signal as two halves of a stereo pair, rather than separate mono signals that are likely to need separate EQ settings and levels.

This particular mixing console has a very neat switch called Line To Mix/Line To Chan(nel). In the up position, the Mic inputs go through the entire channel strip but the Line inputs go through only a separate Line level, then straight to the main mix. That means you can use the main channel strip for a stereo pair of mics and still use the Line inputs for effects returns.

In the down position, the Line To Mix/Line To Chan(nel) routes the Line inputs through the channel strip and disables the Mic inputs for that channel completely. This is the more appropriate setting if you have an incoming submix from stage that is likely to need EQ, monitor and effects mixes.

Aux outputs
These are to the right of a section I’ve marked ‘Outputs and Auxes’ on Diagram P. There are six Aux mixes on this console, so six Aux outputs. So why are four of them on XLRs and two of them on TRS jacks? Well, the default configuration of the GB2 is four pre fade auxes and two post fade, which implies four going to monitor amps and two going to external effects units. (The two middle aux mixes can be switched to post fade but you’d hardly expect the output connectors to switch from XLR to jack…)

Group and Matrix outputs
There are four of these on XLRs, and each one has an accompanying Insert on a TRS jack. They would typically be used for putting one compressor on the drums and another on the vocal mix, for instance.

The outputs for Matrix 1 and Matrix 2 are below the Auxes. If you have read earlier posts in this thread, you’ll know that Matrix mixes are made up from the Group and Mix outputs, which makes light work of providing two alternative monitor mixes, as each one has only six levels to mix. In small venues, the Matrix mixes would be quite acceptable as the only stage monitor mixes. In large venues, it is more likely that the Matrix mixes would be used for general side-stage ‘fills’, while the Aux mixes were used to provide individual artists with specific mixes. Which way you go with this is partly down to have much stage area there is, now many monitor amps and speakers you have available, and how much time there is for setting up monitor mixes.

Main Outputs
As the name suggests, Mix L and Mix R are the main stereo outputs. Again these are equipped with insert points that could be used for a compressor. (You may be wondering if it wouldn’t be easier to simply place the compressor after the main mix outputs, but the insert points are pre fader. Therefore, moving the output fader(s) does not affect the compression threshold. Simply routing the outputs to a compressor would mean there was more compression applied when the faders were up high and less as the output level was reduced.)

The Mono output below this is simply the Left and Right Mix outputs summed. One possible use is to feed dressing rooms, so that artists can hear what’s going on, so make themselves ready in time.

2-Track and Monitor
The RCA jacks (‘phonos’ if you’re a Brit) are designed to connect a 2-track recorder, which can be used both for music between acts and to record the main mix when the acts are on. The signal to the Monitor outputs feeds the control room monitors in a recording situation, or the sound engineer’s monitor speaker in a live set-up. This is normally the same signal as goes to the Headphone socket. Once we get into actually operating the mixing console, the way the monitor system is used with PFL/AFL and other routing options will be explained.

DiagP_inputs_outputs.jpg
 
Well connected

Multiway I/O on a Mixing Console


Before I launch into discussing the sort of connectors and protocols that can support multichannel transmission on a mixing console, it probably helps if I set the scene a little. The Soundcraft console we worked through above uses XLRs and TRS jacks almost exclusively, so why would you need anything else? One reason is that, as you work larger venues, it makes more sense to put all the on-stage mics and DI boxes though a single cabling system, rather than using individual cables.

Another reason, here in the digital age, is that the data we are transmitting around the system does not have to be limited to audio – it can also include control data. That has some really cool implications. For one thing, it means that all the amplifiers can be located where they belong, which is on the closest possible cable runs to the loudspeakers. Thanks to networking technology, we can now control the amp levels from almost anywhere, so we don’t need them situated close to the mix position.

Equally, now we have Wi-Fi and tablets as almost standard issue, every aspect of system set-up can potentially be controlled from any location, whether that means system EQs, power levels to various speakers around the venue, monitor mixes… While this IT-based approach to system control is not new, it used to affordable only on the highest level of concert tour and installed venue systems.

Because the handheld devices most of us can afford are now so powerful, it is cheaper for an audio manufacturer to provide high-level DSP (Digital Signal Processing) functionality in a rack device that interfaces with iPads than it is to make a large-scale analogue mixing console.

Does that mean the hardware-based mixing console is “dead”? No! Trying to manage the sound for a live event using only software control makes about as much sense as trying to drive a car using an app on your phone. In both situations, we need a predictable physical ‘interface’ that our eyes can understand at a glance, but our body can control without even looking.

What it DOES mean is more-and-more ‘smart’ functions entering Sound Reinforcement systems that are affordable to ‘the rest of us’. Before we can get into that, we need to get back on-topic and look at some of the I/O (Input/Output) connectors you may find on a mixing console.

Analog
The point at which a multicore and stagebox comes into play is also the point at which it makes sense to question whether it might be more efficient to use a multiway connector that could carry all channels, rather than a multicore cable that terminates is a series of ‘tails’ with individual XLRs at the console end of the business. If you’re not familiar with the type of multicores I’m talking about, here’s a page full of ‘em https://www.proaudiocentre.com/shop/audio-equipment/stage-boxes---multicores/index.html

One of the more common multiway connectors is known as an EDAC. With their rectangular shape and central locking bolt, they are easy to identify. Some examples are here. Ehttps://www.canford.co.uk/Edac/EDAC-MULTIPIN-CONNECTORS However, there are significant disadvantages to using analog are a transmission technology over long distances. These include the cost and bulk of the cable, as well as the relative inflexibility of analog compared to digital when it comes to transmitting control data along with the audio.

Digital
Almost any standard developed by the computer industry for data transmission has potential use for professional audio. Two of the most obvious examples are USB and FireWire (also known by the snappy name ‘IEEE 1394), both of which are popular choices in home recording systems and smaller SR applications. More on USB here: USB - Wikipedia, the free encyclopedia More on Firewire here: IEEE 1394 - Wikipedia, the free encyclopedia

Cat5, and its variants such as Cat5e and Cat6, which are typically used to carry data over LANs using Ethernet can also be used in pro audio. More here:Category 6 cable - Wikipedia

It’s worth flagging up at this point the distinction between connector types and the data standards, or protocols, of the information they carry. So although a USB connector will always be used to carry one of the USB standards, and the same can be said of FireWire, a Cat5 cable may be carrying any of a number of networking standards, including Audinate’s Dante system (on which more below). Similarly, a 3-pin XLR can be used to carry AES3 (aka AES/EBU) digital audio, rather than analog. Although this makes for a confusing world, all we can do as users is make sure that the equipment we are attempting to interconnect is using compatible standards!

For instance, the ADAT Optical Interface (‘Lightpipe’) uses the same fiber optic connectors as TOSLINK (domestic) and S/PDIF (semi-pro audio) but is not data compatible with them. Lightpipe was originally developed by ADAT as a way of connecting its digital multitrack tape recorders but was adopted by other manufacturers as a handy way to transfer eight channels of audio through a single connector. Because there is no electrical connection, a further advantage is there is no risk of Lightpipe causing a ground loop.

Moving back to Dante, there are several really cool things about it. Technically, it’s excellent, having been developed as a multichannel audio networking technology specifically for audio applications. But it is based on IT standards, so equipment such as Ethernet routers can be used to configure the network. It can also be used with Cat5e, Cat6 and fiber optic. Possibly the best thing of all is that a lot of major pro audio manufacturers have decided to license it. So if you want to integrate equipment from Rane, Nexo, LabGruppen, Klark Teknik, QSC, Yamaha and Shure (to name just a few) you can do so. More here: Audinate - Pioneering the future of AV

Going back to the core topic of audio connectors (and sorry, I’ve brought in a lot of new ideas here) USB, FireWire, Cat5 and S/PDIF connectors are very useful but they do not have the rugged reliability and mechanical locking of connectors used in Sound Reinforcement, such as XLRs and SpeakONs. https://www.neutrik.com/en/neutrik/...speaker-connectors/speakon-r-cable-connectors

The connector family that seems to have become the ‘fiber XLR’ is known as OpticalCON. It’s worth taking a look because there are more and more of these round the back of the rack. opticalCON®
 
Microphones – an introduction

Why frequency response helps you to choose a mic


As guitarists, we know that putting a better set of pick-ups into a guitar can make a lot of difference to the sound. It’s a swap most of us make at one time or another, either because we want to upgrade an affordable guitar so that it sounds like a top-line instrument, or because we are chasing a particular ‘signature’ tone.

Let’s turn this round the other way for a minute and imagine we own a really wonderful guitar, but it has no pickups. (Why would that be? I dunno. If it helps, let’s say I stole the pickups. It’s only an imaginary guitar, so when you set the imaginary cops on me, I’m sure I can talk my way out of it…) Whatever the reason, you now have a Custom Shop dream guitar without pickups. Would you: a) go out and buy the best pickups you could afford, b) the cheapest pickups you could find, or c) leave it without any pickups at all, and hope you can borrow some?

As this is a Strat-Talk forum, I confidently predict that you will go straight for Option A, and quite rightly too. But often the same musician who went for Option A on their guitar will settle for Option B or C when it comes to microphones. Typically, that’s not the musician’s fault. It’s just the mics they end up with are maybe the ones supplied by the venue, or the best they could afford to buy.

The message I’m trying to put across in this post is: microphones are pickups for voices and acoustic instruments. Choosing microphones of good quality is an important starting point, especially if you can afford it. But knowing the right ones to choose for the job – and how to position them – is the key to getting the best possible result, whatever the budget.

Before we get into specific makes and models – or even the general types of mic you can encounter – let’s take a look at the characteristics we might want from a ‘perfect’ stage microphone. This will help us to get to put the ‘paper specifications’ for mics into some practical context.

Reading the spec
Diagram Q shows a series of frequency plots from 20Hz-20kHz. You can read plots of this type very much as you would the settings on a graphic equalizer: the low frequencies are on the left of the graph and the high frequencies are on the right, with the ‘volume levels’ shown in Decibels from lowest at the bottom to highest at the top.

The frequency range of 20Hz-20kHz is used for most microphone specifications because it is the same range a CD is capable of reproducing and is nominally the range of human hearing. The reality is slightly different, in that very few adults can hear anywhere close to 20kHz, especially if they have beer inside them. Also, most Sound Reinforcement systems have little frequency response below 40Hz. And even those rated up to 20kHz will typically be -10dB* (about ‘half volume’) that high up in the frequency range.

*******************
*I don’t want to get too sidetracked into the relationship between Decibels and loudness, but as a rough rule of thumb, a 10dB increase would be perceived as being twice as loud, and a 10dB decrease (-10dB) would sound half as loud. There is very good information about Decibels here: Loudness volume doubling sound level change factor of perceived loudness decibel scale log compare intensities formula calculate power level noise levels volume logarithm dependence three four fold loudness sound - by what factor does level decrease
And here: About Decibels (dB)
*******************

These limitations are good news when considering SR applications because high-quality condenser microphones that can come close to the theoretical ideal of 20Hz-20kHz and can stand up to use on stage don’t come cheap. The horizontal red line in Diagram Q is the best possible ‘flat’ frequency response across the full range. The yellow line is based on the actual frequency plot for a microphone that costs about $3,000 (£/€2,000). The solid blue line is more like the response you can expect from a stage vocal mic costing typically $100 or less.

So does that mean that the only way to get top quality reproduction when using 10 mics on stage is to go out and blow $30,000? No! Here’s the reason why.

The frequency response of the stage vocal mic (blue line) appears limited but is actually quite useful for the job it was designed to do. For one thing, there is almost no useful sound from the human voice below 100Hz, so the fact that our vocal mic slopes off towards that range helps it to avoid picking up unwanted sounds, such as stage rumble, plus unwanted spill from the bass guitar and the low end of the drum kit directly.

Generally speaking, the most important frequency range for the human voice in terms of character and intelligibility is between 4kHz and 8kHz, which is where most stage vocal mics exhibit a ‘presence peak’. This helps vocals to cut through the mix and does not diminish perceived vocal quality unless taken to extremes. (Human hearing is most sensitive in this region, which is why I'll refer to it again and again.)

From the microphone designer’s point of view, lifting the frequency response in the ‘presence’ range also helps to ensure a usable amount of response at the frequencies beyond 15kHz. This is the frequency range where vocal ‘sibilance’ is experienced – ‘ess’ sounds and a breathiness that lends sparkle to vocals.

But not everything we’ll want to mic up on stage is always a singer. Vocal mics are also useful on electric guitar speakers, snare drums and toms (plus brass and brass-wind, (‘woodwind’ in Europe) depending on the sound you are after). They are not so good in any application where extended low or high frequency response is an advantage.

On a kick drum (bass drum, to us in the UK) a flat frequency response is not very important. So although you can get very good results using a studio-quality mic with a full frequency response, that’s an expensive way to go. Most mics designed for kick drum have a peak around 50Hz, to ensure a solid low-end ‘thud’ and another somewhere in the 5kHz-8kHz region, where the ‘slap’ of the beater hitting the head can be found. What happens in the frequencies between those two points is not so critical, which is why many kick drum mics have a frequency plot that looks like a mountain range.

Bass guitar is a different issue. Although the fundamental notes on a 5-string bass lie between 30Hz and 98Hz, the overtones and harmonics form a very important part of the sound. As a result, it’s not safe to assume a microphone is ideal just because it has an extended low end. In a lot of situations, a DI (Direct Injection) box, or a direct output from the bass player’s amp, will give better results. Double basses benefit greatly from a microphone with a wide frequency response, but a transducer or pickup can be the more practical option if the player has already fitted one to the instrument. The best solution greatly depends on the situation and the sound the act is aiming for.

A similar pay-off exists with acoustic guitars, and indeed all other acoustic stringed instruments. It is extremely difficult to balance traditional orchestral instruments in the context of a rock band, due to the differential in volume levels. In those situations, transducers and pickups can be the only way to go. But for pure sound quality, microphones will always be the way to go – and the closer they are to the ideal ‘flat line’ response, generally the better the results will be. (In real-life situations, it can still be a good idea to shed some low-end response but that idea can wait until another day.)

Going back to percussion: cymbals, including hi-hats, are literally at the other end of the spectrum to bass instruments. Here, extended high frequency response is everything, so a pair of studio-quality mics forming stereo ‘overheads’ for most of the cymbals, and another specifically on the hi-hat, makes for a good starting point.

Similarly, when miking an upright or grand (ie ‘acoustic’) piano, the sheer range of the instrument means that only mics with the flattest, most extended, frequency responses will do full justice to the instrument.

As a brief summary: the aim is to produce a full frequency mix, full of any unintended coloration. Because different instruments operate in different parts of the frequency spectrum, we can achieve our aim without using a full-frequency mic in all vocal and instrument applications. In fact, microphones with limited frequency response can be helpful if they exclude parts of the frequency spectrum that are not meaningful for the voice or instrument we want to amplify.

However, frequency response is only one criterion for selecting stage microphones. In my next post, I’ll look at other issues such as polar patterns, and sound pressure levels. (I’ll also explain what the dotted blue line on Diagram Q is all about…)

DiagQ-Frequency-plots.jpg


Polars bared

Polar Patterns and SPL Explained

In live sound applications, we tend to use ‘directional’, or ‘unidirectional’ microphones almost exclusively. To put it as simply as possible, these are mics that pick up loudest from the front, less at the sides and hardly at all from the back. This is how it is possible for singers to stand in front of loud stage monitors without howling feedback (which is exactly what happens when mics pick up the sound from the speakers and then sends it to the amplifier, back through the speakers…)

However, there are inherent limitations to directional microphones, and it is useful to understand what those limitations are. Not only will it help you to use mics more effectively, it will also help you to understand why mics that might look similar on paper can be quite different in real-world use.

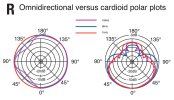
Diagram R contains a lot of information, so let’s go through it a step-at-a-time. First off, what is a ‘polar plot’? It’s a little map that shows you, by points of the compass, how loudly a mic picks up from the front, the sides, the back – and all points in between. For very expensive microphones, the frequency and polar plots supplied are computer-generated readouts of the actual unit you are buying. But for most mics, the plots are generalized descriptions of what the manufacturer is shooting for. Part of what I hope to do in this post is help you to understand how much information you are being given, so you have a better idea of what you’re buying into.

Let’s start by looking only at the red lines, which represent measurements made at a frequency of 1kHz. The mic on the left has a perfectly circular plot at 1kHz, which tells us that it picks up at the same volume level all the way round. (Think of this as a perfect sphere, rather than a circle, because the 2D plot is actually giving us information about what’s happening in 3D space.) A microphone that has this pick-up characteristic is called ‘omnidirectional’.

The mic on the right has a plot that shows far less pick-up to the sides and the back than at the front. This tells us that the microphone is to some extent directional. The most common type of directional mic is called ‘cardioid’, because the plot looks somewhat heart shaped. However, ‘cardioid’ is not one absolute standard. There are ‘wide’ cardioids, ‘tight’ cardioids, and as I’ll attempt to show you, cardioids that are plain all over the place!

Very often, when you go to buy a mic, the manufacturer has placed a handy graphic on the packaging that looks very like the red-line plots we’ve just been examining. While this is useful for telling you that one mic is omnidirectional and another is cardioid, it is nothing like the full story about how a mic really performs. To get closer to the truth about how a mic performs in real life, you have to take measurements at a number of different frequencies. In Diagram R, these are represented by a blue line for 8kHz and a purple line for 16kHz.

The first thing I’m sure you’ll notice is that these new measurements are nothing like as regular as those snappy graphics we got at 1kHz. Looking at the omnidirectional example on the left, the performance isn’t too bad, with -10dB at a couple of points by the time we get to 16kHz. Most omnis will exhibit something like this, and the most likely culprit is the way the capsule is physically mounted, the mass of the casing etc. We might use a microphone like this to record a piano in a concert hall and we would not have to sorry that reflected sound from the room was colored unduly by the mic.

The plot on the right tells a different story, in that the curves at 8kHz and 16kHz are markedly different than the one at 1kHz. To better understand the problems this presents us with, you might want to go back to Diagram Q, which shows a typical frequency plot for a stage vocal mic (solid blue line). As I suggested in the previous post, that on-axis response is very usable.

But look at the frequency response shown by the dotted blue line, which represents the same mic but 135° off axis. Would you want a mic curve like that? Well, bad luck fella, because the chances are you are already using one that performs like that, or even worse. I’ve already flagged this up in previous the thread I started on venue acoustics but I’ll say it again here: the off-axis frequency responses shown in Diagrams Q & R are typical of some of the best vocal stage mics out there. The inherent limitations of directional microphones have to be worked round and cannot be solved simply by throwing more money at the problem.

NB – It is worth pointing out that cheaper stage mics will not even achieve this level of performance. Those are the mics that usually come with only a single idealized plot, based on a single frequency. While it is not impossible to get good results from cheaper mics, you will need more skill and ingenuity. At the other end of the scale, really up-market mics often come with a split polar plot, showing maybe two frequencies per side. This is simply to make the plots for each frequency easier to read. The guys who make those mics aren’t trying to hide anything – they’re showing off.

If the off-axis response of cardioid mics is so irregular, what can be done to minimize the coloration this will cause? The single most successful solution is to keep on-stage volume levels in check, so that mics are not picking up unintended sounds off-axis. It’s worth considering that in many situations, a loud on-stage amp will be picked up by multiple mics, all at different degrees off axis and all at different distances from the sound source. The affect on sound quality can only be negative.

It also helps to use close miking techniques, but this can cause problems of its own if done to excess. For instance, two microphones used as a ‘stereo pair’ a few feet above a grand piano can give a balanced impression of the instrument. The closer the microphones are placed, the more they will focus on particular ranges of the instrument. In theory, you could address the problem by adding more and more mics, but the result is likely to sound less and less like the instrument you are attempting to amplify.

Similarly, if you get in closer to brass instruments than about a yard (1m), you are no longer picking up the sound these instruments make in a room, due to the way in which the lower frequencies radiate from the bell. A similar situation exists with brasswind (woodwind). There is a further sting in the tail, which I’ll explain in a minute.

Another approach is to use more directional microphones. As mentioned earlier, some cardioids are ‘tighter’ than others. There is also a ‘hypercardioid’ pattern that picks up even less from the sides than a cardioid but it’s not a free lunch. The tighter the pattern gets at the sides, the more pronounced the ‘lobe’ around 180° becomes. (You can see this on a cardioid as well, if you look again at Diagram R.) So, although a hypercardioid mic can reduce spill, it can also increase feedback problems if there is a monitor wedge facing directly at the performer.

Now then, if you’ve ever cupped a hand over a stage mic, you’ll know how easily that simple action can push a mic into feedback. That’s because you’ve modified the polar response of the mic by mechanical means. Imagine what happens if you cup an entire trombone bell over a mic! Yep, and if you are using a hypercardioid mic, that lobe gets so much bigger as that bell looms over the mic…

This is an appropriate point to introduce the concept of SPL (Sound Pressure Level). As well as being a useful way of describing the sound level from a rig, or the volume from any sound source, its also important when deciding if a particular mic is ‘up to the job’.

If you’ve ever had your head in a bass drum when the beater connects with the head, you probably didn’t emerge muttering: “I reckon you’ve just unleashed anything in the region of 140dB on my unprotected ears. How interesting.” Similarly, if you’re walking towards a trumpet player, it’s likely you’ll think “jeez that’s loud”, rather than: “When I was four yards away the SPL was in the 96dB region but now I’m only a foot away it must be in excess 130dB.” Far more likely you shouted: “Hey fella! You could turn me deaf doing that!”

Well, mics have a point where they can either be damaged by the incoming SPL, or start to distort. Hence for percussion and brass especially, it is very useful to know whether the mic you intend to use can withstand the kind of SPL you are about to inflict on it.

Next time, I’ll introduce some typical microphone design types (dynamics and condensers) and see how they compare in terms of SPL, sensitivity and frequency range – all of which are inter-related.
DiagR-polar-plots.jpg
 
Microphone – Dynamic and condenser performance compared

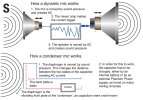
Diagram S shows the operating principles of the two types of microphone design used in Sound Reinforcement. The more common of the two is the ‘dynamic’ mic, shown at the top. It is the cheaper of the two designs to manufacture, and is extremely robust. Unsurprisingly then, it is an exceptionally popular choice, especially when budget is a consideration.

Dynamic mics are also very easy to understand, because the concept is basically the same as a loudspeaker but in reverse. However, the real-life engineering that goes into a dynamic mic is a lot more refined than the diagram implies. (No-one has really produced a mic that looks like a small woofer since about 1920!) Rather than a cone, a modern dynamic mic using a lightweight plastic diaphragm that looks a bit like a tweeter for a Hi-Fi speaker.

No matter how light the material used to create the diaphragm, in a dynamic mic it still has to be coupled to the coil of wire that moves over a permanent magnet, thereby creating current. The added weight of that coil, and the former it sits on, is one of the reasons a dynamic mic can’t rival the high frequency response of a condenser mic. With mass comes inertia, meaning that the diaphragm becomes more resistant to movement as the frequency increases. To put it another way, as the air pressure changes faster and faster, the diaphragm assembly moves less and less. Let’s see how that compares to a condenser design.

‘Condenser’ used to mean the same thing as ‘capacitor’ but the term is no longer used in generals. For some reason, ‘condenser’ mics continue to be known by this name, even though they could logically be termed ‘capacitor’ mics.

As a general design principle, a capacitor has two plates with a voltage passing between them. In the condenser mic, one of these plates is very light and vibrates in response to changes in sound pressure. This is the diaphragm and it is formed from a very thin sheet of plastic that is coated with gold, or some other highly conductive metal. (Forget thou, we’re talking microns here.)

The back plate is a rigid sheet of metal and is usually perforated to allow air to pass, so that it does not inhibit the movement of the front plate (ie – the diaphragm).

When the diaphragm vibrates in reaction to changes in air pressure, it changes the distance between the two plates and therefore changes the capacitance. (When the plates move closer together, the capacitance increases and a charge current occurs. When the plates move further apart, the capacitance decreases and a discharge current occurs.)

The capacitor can only work if a DC voltage is applied to the system. This is why condenser microphones require either an internal battery, or an external Phantom Power supply, as often found on mixing consoles. The standard voltage for Phantom Power is 48v DC, but some condenser mics can work on voltages as low as 18v.

One of the reasons the diaphragm of a condenser mic is that it has nothing attached to it, unlike the diaphragm in a dynamic mic. In fact, the only thing that touches the condenser diaphragm is the ring on which it is mounted, not unlike the way a drum head (drum skin, if you prefer) is stretched across the shell of the drum. As a result, it has very little mass and responds readily to even very high frequencies.

If you refer back to Diagram Q, earlier in this thread, you’ll see the difference between the typical frequency response of a high-quality dynamic mic (blue line) versus a condenser (yellow line).

So, if condenser mics are that much better, why haven’t they taken over from dynamics as the main stage mic? Part of the answer is cost, not just the mics themselves but also in providing phantom power for them, a feature you don’t often see on smaller mixers and mixer/amps.

Also, condenser mics are very ‘sensitive’. The upside of this is that they convert more of the incoming sound pressure into usable signal. The downside is that they are easier to damage than the more robust dynamic designs. This is not just about mechanical shock, although dropping a condenser mics certainly isn’t recommended. Simply allowing particles of spit, foodstuffs, and the like, to get stuck onto the diaphragm of a condenser mic will start to degrade its performance. (Basically, you’re increasing the mass of the diaphragm, albeit, in a very unscientific way…)

Even excessive sound pressure level can damage a condenser mic. Take another look at Diagram S and imagine that the distance between the two plates of a condenser mic is actually tiny. It doesn’t take a genius to work out that a kick drum with a 22-inch diameter, when operated by a drummer with a taste for music on the heavier side, can generate an SPL high enough to propel a few microns of mylar diaphragm straight into the back plate of a condenser mic. This is not good news.

There are obvious ways we could design a condenser mic that will withstand a higher SPL. Possible solutions include making the diaphragm thicker and moving the back plate further away, but the result is likely to be a mic with poor sensitivity and limited frequency response. So far, all we’ve achieved is a condenser mic that is more expensive to produce than a dynamic but fails to out-perform it!

Amazingly, there are professional condenser microphones that will withstand SPLs of more than 145dB with almost no distortion, without compromising frequency response or sensitivity. Part of the secret is to use a very thin diaphragm but to put it under increased tension. You might imagine that such precise engineering comes with a big price tag, and you’d be right.

As a rule, in SR applications, you can keep condenser mics for cymbals, strings and woodwind. You could say this is all the stuff that needs to go into the washer and be set to ‘delicate’. For everything else, it can go on a ‘hot wash’, meaning there’s a dynamic mic that will do the job as well, or better. One of the big exceptions is ‘star’ singers, especially if they do not normally use rock-style close miking techniques. You can’t expect to be thanked if you tell a big-name opera or folk singer: “Your SM58* is the one with the band of gaffer tape round it!”

*The Shure SM58 is a great mic for many applications, just not necessarily the best choice in that particular situation.

Next post, let’s have a look at some specific ways of miking the artists on stage, and also the issue of whether a DI box is more appropriate.
DiagSdynamicAndCondenser.jpg
 
Just for kicks

Microphone techniques – Drums

There is a lot of advice available on-line about how to mic up various instruments. Some of it is very good, and some of it is well informed but refers to one brand only (which seems fair enough if it’s a manufacturer’s web site). My only criticism of a lot of this advice is that it does a great job of telling you how to do the job, but not such a good job of explaining why. As a result, it can be hard to apply the advice when you find yourself in a slightly different situation to the one described.

For instance, you may find yourself working with a supplied system where you have to work with the mics you’ve got, rather than ones you may have read about. In circumstances like that – when you probably don’t have time to experiment – it’s useful if you can make viable choices of mic for each instrument or voice.

As I’m writing this thread mainly for guitarists (I'm guessing), it might seem reasonable to start with miking acoustic guitar. Actually, I’m going straight for the jugular and looking at mic techniques for drum kits. Due to the diversity of percussion within a modern kit, and the great variety of mics you could employ, this looks like one of the most daunting areas for any would-be sound engineer. As it happens, it’s not so hard once you’ve broken the job down into different areas of the kit.

(If you really want to make life easy for yourself, you can buy a complete set of mics designed specifically for drums, but it isn’t necessary to do that. As we’ll see, many of the popular choices of drum mic have other applications in Sound Reinforcement.)

Let’s start with the kick drum (aka bass drum), and then move onto the snare. That will give us a solid foundation on which to build the rest of the kit.

Kick drum
First off, what mic to choose? Every mic manufacturer of note makes at least one model specifically recommended for kick drum but ‘classic’ choices includes the AKG D12, AKG D112, E-V RE20, all of which are dynamic mics with extended low-end frequency response. If you happen to have them available, any high quality condenser mic should do the job well, providing it will cope with an SPL of around 145dB. Personally, I’d choose a dynamic mic for live use, do to their ‘bullet-proof’ construction and relative affordability. Stage vocal mics are not generally a good choice, due to their restricted low-frequency response, but they will come to no harm if you have to use one ‘in an emergency’. A big exception to this is the Sennheiser MD421, which does a fair job. Note that it has a rotary bass roll-off switch near the connector. You definitely do not want to roll off any low end!

A common approach when recording kick drum is to pull a pillow or cushion inside the drum and place a mic on top. While it works well, I’m not a fan of this approach on a live stage because it throws away a lot of the tone and projection the drum is capable of.

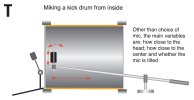
Diagram T shows a bass drum mic mounted on a small telescopic boom stand, which makes it possible to get the mic inside the drum and close to the beater head. This is obviously only possible if the front head (the ‘resonant’ head) has been removed, or has a hole in it big enough to insert a mic. Let’s look at this set-up first, and then deal with the question of how to mic a kick drum that has both heads fitted.

Once you’ve chosen your mic, the big question is where to place it. As the diagram suggests, the variables are how close to place the mic to the head, how close to the center, and whether the mic is square in to the head, or at an angle. These variables are similar to the ones you find when miking up a guitar cab, where the center of the speaker cone sounds a little different to the edge. However, there is one significant difference, and it’s so fundamental to miking up drum kits that I’m going to give it an ‘NB’.

NB – Every mic you use on a live drum kit will pick up the whole kit to some degree! So the snare mic will pick-up a fair amount of hi-hat, the overhead mics will certainly pick-up the hole kit and not just the cymbals… and the kick drum mic will pickup mostly the snare and toms, albeit they way they sound from inside the kick drum (or just in front of it, if there is a resonant head fitted to the drum).

So please bear my ‘NB’ in mind when I say that the closer you put the mic to the head, the more beater ‘slap’ you’ll capture, while positioning it further away will capture more of the tone of the drum itself, along with anything else that is audible from that position. As a starting point, I’d suggest placing the mic about an inch-or-so from the center of the drum head, then consider moving it if you do not get the result you are looking for. If you are using a dynamic mic, it's worth bearing in mind the 'proximity effect' which gives increased bass emphasis when miking very closely. Depending on the mic, this may or may not be the effect you're after.

When miking a bass drum from outside, usually because there is a resonant head in place, you can find you get a more balanced sound with the mic a foot or so away from the front head. This means your kick mic will pick-up more of the rest of the kit, of course. You will also get a lot less ‘slap’ from this position, but that may be exactly what the drummer intends. A good sound engineer helps the musicians to put their sound across to the audience, rather than imposing a ‘one size fits all’ approach.

If you are getting a taste for this, there's an excellent article on kick and snare miking here: Kick & Snare Recording Techniques It comes complete with sound samples, so you can judge for yourself what difference moving the mic, or using a different model makes. (Please bear in mind that the article is aimed at recording, so some of the set-ups are totally impractical for stage use.)

Next up, I'll be looking into the wonderful world of snare drum miking.
DiagTkickDrum.jpg
 
Snare drum
What mic to choose? The old-school approach is to use a dynamic vocal mic, and the one a lot of engineers prefer is the Shure SM57. However, there are more modern alternatives with extended high frequency response, such as the Audix D1 condenser mic, or the Beyerdynamic M201. Some are small enough to clip on a small gooseneck to the rim of the drum, which has the advantage of reducing the number of mic stands clustered around the kit. As a general rule, condenser mics with a small diameter work better in this application than large capsule designs. This is because, in close miking, large capsule condensers can exhibit phase issues from one side of the capsule to the other. These normally become insignificant when the mic is placed further away.

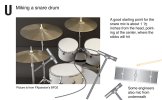
Diagram U shows the typical placement for a snare drum mic, which is about 1 ½ inches from the head and facing the center where the sticks will hit. From a purely acoustic point of view, it doesn’t matter overly where around the rim the mic is mounted but placing it as far away from the drummer as possible will help to keep it out of harm’s way. It is also worth considering the relationship between the snare mic and the hi-hat, in that swiveling the snare mic somewhat towards the bass drum will help to reduce the amount of spill from the hi-hat.

Some engineers prefer to also mic from underneath the snare drum, which produces a deeper sound but also picks up more of the sizzle from the snares themselves. Because the top head will be moving away from the upper mic at the same time as the bottom head is moving towards the lower mic, it is usually desirable to reverse the phase of the lower mic at the mixing console input. However, it is unwise to assume an exact 180° phase shift when two mics are used, because other factors such as physical distance can skew the result. For this reason, some engineers avoid the dual mic approach to obtaining a snare sound. A few engineers prefer the sound of the snare drum miked from below only. Most engineers feel that the impact of the sticks on the batter head is a very important part of the sound and choose to mic from above, if only one mic is used.

(Even if only one mic is used on the snare drum specifically, there can be phase problems between the snare mic and the overhead mics, which will pick-up the snare, but from further away. That’s a subject we’ll get to later.)

Miking a snare drum too closely can cause a very unnatural sound, due to the emphasis of some overtones that are not normally noticed when listening to a snare drum directly in a room. Even when intelligently miked, snare drums are often greatly enhanced by careful ‘tuning out’ of frequencies that give the sound an irritating ring, using the sweep capabilities of the equalizer’s mid-bands.

One of the difficulties in generalizing about snare drums is that they come in a considerable range of sizes and shell materials, and can take on very different sound characteristics depending on how they are tuned and played. In addition, the desired sound from a snare drum varies greatly from genre to genre. If we take jazz, country & western and AOR as three general examples, it soon becomes obvious that one act’s idea of a great-sounding snare is going to be an absolute disaster if transferred straight to the other two acts.

This is another example of why a sound engineer needs to understand what the act wants to sound like, rather than always miking and EQing the same way. This is especially true of the snare, as it is one of the signature sounds in any mix that involves a drum kit.

Tom Toms
Compared to the snare and kick drums, toms are relatively undemanding. In fact, for jazz it is often better not to mic them at all and let the overhead mics put over the sound of the toms. But in rock, close-miked toms are a defining part of the sound, so you’ll general want a mic for each tom.

What mics to choose? Your target sound and available budget will determine your choices here. If you want plenty of weight to the sound, with minimal issues regarding spill, dynamic vocal mics work well. The usual suspects include Shure SM57 and Beta56, and Sennheiser MD421. For a more detailed sound, condenser mics can be a good choice, but their extended frequency response will also increase the amount of spill from the cymbals. Condenser mics such as the Shure Beta98 are small enough to clamp-mount – meaning another mic stand you can kiss goodbye – and have the advantage of a gooseneck that can aid accurate positioning.

In terms of mic placement, toms are not radically different to a snare, but capturing the stick strike is less important. Combine this with a need to minimize cymbal spill and you are likely to find angling the mics more steeply, towards the outer third of the head works better than aiming dead center.

Next stop, hi-hat and overheads, where condenser mics rule supreme.
DiagUsnareDrum.jpg
 
Ya no kidding DonO.I read along with Simons post but its way over my head hahahaha. I dont record or play out so.But ya great info for folks
 
Hi-hats and overheads

The good news is that miking hi-hats is fairly easy. The less good news is that cleverer people than me could probably write a book about overhead mic techniques! It’s not that it’s so hard to get a good result, more that there are lots of ways to get there.

One thing that hi-hat and overhead miking have in common is that there are cymbals involved, and anywhere there are cymbals you can bet on there being major amounts of high frequency energy (although less so for the hi-hat). That’s right, this is a job for condenser mics!

Hi-hats
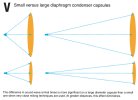
What mics to choose? As far as drum kits go, the hi-hat is not one of the louder guns, so you don’t have to worry overly about how much SPL the mic can take. Because you’ll be miking fairly closely, a small condenser with a small diameter capsule tends to work better than a large one. Diagram V helps to explain why small capsules often work best for close instrument miking, while large capsules work better in more distant miking techniques. (However, it is a very generalized explanation. Close miked vocals can sound great using a large capsule condenser mic, while small capsules can be very effective in many mic configurations where large capsule condensers might seem the most obvious choice.)

Back in the day, an AKG CK1/C451 was often the condenser of choice for hi-hat recording. (An AKG C1000 does a similar job.) These days, almost every mic manufacturer offers a small capsule condenser that is suitable for hi-hats. There are also dynamic mics with extended high frequency response that makes them suitable– notably the Shure SM7B – but these are generally expensive units, so you are unlikely to choose them on cost grounds only.

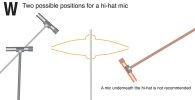
Diagram W shows two possible positions from which to mic a hi-hat. Although the overhead position is one I’ve most often seen, I’ve had good results with a mic to the side, which is where most of the sound energy radiates from. It won’t take you long to try both and make your own mind up. In either instance, I’d suggest a distance of around 8 inches as a starting point. Get much closer and the fact that the upper hi-hat rides up and down is likely to caused unwanted shifts in frequency and/or level. Also, when miking from the side, you are effectively pumping air into the mic if you get too close! Whichever technique you go with, pointing the mic away from the snare will help to give maximum separation.

NB – If your hi-hat mic has a bass roll-off, use it! There’s nothing much happening down at the low end apart from stage rumble and maybe some mechanical noises from the hi-hat mechanism. Yes, you can also get rid of this stuff at the desk but taking it away before it even reaches the mix position is even better.

Overheads
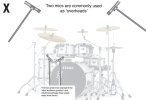
Before we get into the question of which mics to use, let’s take a look at the whole role of the overheads and why they are so critical to a good drum sound. Taking an absolutely purist approach, two matched microphones – or one stereo mic ¬– should be all we need to capture the sound of a drum kit. After all, two mics are all we need to get a good sound from a grand piano. However, that assumes that the sound we hear when standing in front of a drum kit is what we want the audience to hear – in other words, that we can treat the kit as one giant musical instrument, and regard our role as being to simply deliver that natural sound to the audience. If that were the case, all we would really need to do is put a couple of mics approximately where the ears of a listener would be. This is shown as ‘ideal audience position’ in Diagram X. You could say those mics are sitting in the best seat in the house.

There are two problems with this assumption. One is that there are generally better listening positions than any that the audience will ever enjoy. (Just don’t tell the audience…) Many engineers have found that if only one mic position is going to be used, somewhere above the drummer’s head works best.

But the bigger problem with our ‘pair of mics’ scheme is that the natural acoustic sound of the kit is not what we expect to hear in many styles of music. Today, our reference points as listeners are often a combination of music that has been recorded in the studio and concerts where the drum kit is heavily miked and greatly modified at the mixing desk. So we have come to expect that the kick drum will be higher in the mix than it would be acoustically (especially if heavily damped), that the snare will have no real ring to the shell but will sit in a lushly reverberant space, toms will pound mightily… or whatever modifications to the ‘basic’ sound of the kit we might want to make.

Without muddying the waters too much, I’m now like to compare two philosophies to overheads, which I’ll call ‘purist’ and ‘rock’.

The purist approach
Out in the real world, a ‘purist’ mic set up will be something like the overheads shown in Diagram X, plus a kick drum mic and a snare drum mic to allow for a bit of tweaking. This tells us something very significant about the overheads: they are not there simply to pick-up the cymbals; rather they pick-up the entire kit. The kick drum and snare mics are there simply to allow some additional adjustment in sound and level for these two drums. Because of this, it is more useful to consider the overheads as the ‘main’ mics and the other two as ‘spot’ mics that are there to augment the main drum mix.

The rock approach
The other approach is to treat the overhead mics as only for the cymbals, and to roll off as much of the lower frequencies on those mics as is possible, so as to minimize the amount of drum spill into the overheads. In this scheme, the individual mics are no longer simply ‘spot mics’, they are more like DI boxes, in that the idea is to keep each drum as separate as possible. This tends to be the preferred approach in very high volume environments and where heavier amounts of EQ are used on individual drums.

The split between those two approaches really only become apparent with the way the mics are treated at the mixing console. Fortunately it makes no real difference to the placement of the mics.

Going back to Diagram X, it shows typical overhead mic positions for a stage set-up. Ideally, the mics should be at least six feet from the floor, or higher to get the best blend of cymbals between the two mics. Typically, these will be right above the kit and facing downwards, or slightly in front of the kit and facing inwards. (These ideas may have to be modified if the drummer’s monitors are causing feedback problems. In that situation, it is also useful to question whether moving the monitor wedges is less destructive than moving the mics.)

Going back to the ‘purist’ approach, there are ways of combining two microphones that will give a more coherent stereo image than the ‘two spaced mics’ most commonly used in live Sound Reinforcement. You may have heard of a ‘crossed stereo pair’, for instance. While these are valuable techniques in the recording studio and may be applicable to low volume stage environments, I’m not going to look at them in detail here. I’d rather discuss the most viable ways of going about the job than get sidetracked into techniques you ‘could consider’.

What mics to choose? Your choice is enormous, and many experienced engineers have firm favorites. These often vary from one engineer to another, despite the fact that both engineers get great results. The main criterion is that you have two closely matched condenser mics that will make a balanced left and right channel (in fact, if you bought them as a calibrated ‘stereo pair’, so much the better). Where budget is no problem, large-capsule condensers from Neumann and AKG are two that crop up over and over.

For those of us buying mics from gig money, there are a lot of cheaper, small capsule condenser mics that will do the job very well, some from the ‘big name’ manufacturers but also many brands aimed at the project studio end of the market. You don’t have to spend mega money to get good results.

Before I move onto miking techniques for other instruments, it’s probably a good idea if we take a look at what happens to the drum mics at the mixing desk. I’ll make that my next thread.DiagVsmallLargeDiaph.jpgDiagWhiHatMicPositions.jpgDiagXoverheads.jpg
 
EQing drums

Before we move on to miking other instruments, I said I’d cover the topic of EQing drums. I’m doing that because EQ is a very important part of getting the drum sound you are aiming for. What I’m not going to do is dwell too much at this point on setting gains, subgrouping, using the PFL functions etc etc. Although they too are very important when setting up a mixing console, there is SO MUCH to say on those topics that we will have drifted away from talking about mics, and will spend the next days and weeks discussing the mixing console, outboard equipment and more. That can wait for a while.

For now, here are a few preliminary pointers:

1. Drums are traditionally found on the early channels of the desk (ie furthest from the outputs).
2. Although it makes no real difference electrically which channels you use, make sure to lay them out in a logical sequence that makes sense to you. Otherwise, when the house lights go down, you will find it harder to keep tabs on ‘what’s where’.
3. You’ll probably want to (sub)group your drum channels, so that you can control them from one or two master faders.
4. It is important to set your input gains at the start but don’t forget they can be affected by subsequent EQ, as well as natural variations in the loudness of the drums.
5. You should at least consider whether some of this process is best conducted using headphones. You’re not supposed to be giving a demonstration in mixing techniques!

Above all, the question I would urge anyone to ask themselves before they touch those dials is this: What am I hoping to achieve by EQing the drums? The obvious answer is: “To make them sound better.” Maybe a better answer is: “To allow them to work more effectively in the mix.”

You might be thinking: “Isn’t that just saying the same thing in different words?” To an extent, maybe it is, but the point I am trying to make is that you have to consider not only how the drums sound in combination but also their contribution to the sound of the complete band. (On a related note, mics on the individual drums will pick up other drums – and other elements on stage. Often, it’s paring away the unwanted elements that creates a clean drum mix.)

The tools of the trade
The most important tools any sound engineer can bring to the task are located on either side of the head. Those ears are more instructive than any microphone and they are connected to your brain, the most powerful processor in the entire system! If the adjustments you make to the controls please your ear, you must be doing the right thing. While experience tells you things that will ‘probably’ be useful, only your ears can tell you if you are taking the right approach on this occasion.

Moving onto the EQ section of the desk, it’s useful to reacquaint ourselves with the three parameters all EQs contain:

1. Level (aka amplitude). Most EQs will cut and boost, often by 15dB. (As we’ll see, that doesn’t mean it’s normal to boost signals by that sort of amount. For one thing, you’ll probably cause feedback.)
2. Frequency. Many channel EQs have one or two mid range bands with sweep frequency controls. These are particularly useful when you want to eliminate unwanted frequency ranges.
3. Q. The most advanced equalization circuits allow the Q, or contour, to be adjusted. Very narrow Qs are useful for notching out problem frequencies without affecting the overall timbre of the signal, while wider contours are useful in applications such as creative enhancement (ie, using the EQ more as ‘tone controls’, rather than as a corrective tool).

EQs that allow all three parameters to be adjusted – Level, Frequency and Q –are referred to as ‘parametric’. EQ sections that have sweep controls but no Q are sometimes called ‘semi-parametric’. Consoles based on analog technology, have parametric EQs on only the most up-market models because they are complicated and expensive to make. In the digital domain, there is no real cost implication to providing access to the full range of parameters. So for the manufacturer of digital desks, the type of EQ provided is based on what will be most helpful to the user. Some people find a full set of parametric controls quite intimidating!

EQ Cut. Often simply marked ‘EQ’, a switch that cuts or bypasses the EQ on that channel is a very useful tool for instant comparison. It’s worth considering that unless you are making the kit sound better, no EQ at all may be the best choice.

High Pass Filter. Many consoles also provide a high pass filter on every mic/line channel and these are often marked ‘100Hz’ to indicate the frequency below which frequencies will progressively diminish. There may also be a graphical symbol to suggest that it is the low bass end of the spectrum that will be removed.

Using the tools
It is worth using the HP filter on every channel where it does not compromise the quality of the instrument being miked. In the case of a drum kit, this will probably be everything except the kick drum, unless you are after a lot of ‘thud’ in the low tom.

This simple act of filtering out some unwanted frequencies (spill from the kick drum, nearby bass guitar rig, general stage rumble…) will greatly clean up your drum mix. But the benefits don’t stop there because you will get more headroom though the entire signal chain. This goes all the way to the subwoofers, which won’t be struggling to reproduce low frequencies you didn’t even want in the mix.

When it comes to applying EQ to specific mics, I’m going to give you some general notes and what you might want to try. What I’m not going to do is suggest that there are some hard and fast rules you can follow every time you mic up a kit. You’re the one who chose and placed the mics and you’re the one who can hear how it sounds, so you’re the one who needs to make the artistic judgments.

Kick drum
Until the mid 1980s, the preference tended to be for the kick drum (bass drum to us Brits) to have a rounded sound that was relatively low in the mix. Then a much harder drum sound came in, driven in part by what worked best on the dance floor. Drummers started to tune for a tighter sound, and mic manufacturers started to voice their products differently.

As a result, if you match, say, an AKG D112 with a drummer who already has a hard sounding kick, the result can be a little like striking a packing crate with a hammer! The D112 already has a harder sound than the older D12. In this circumstance, you might consider adding a little EQ to the low end. (This might be the LF shelving circuit, or better, it could be a sweep mid if it goes down as low as 80-100Hz. The second option would give you most control.) It’s quite possible you might also want to cut some mid in the 2-4kHz area if the sound is still a bit boxy.

Alternatively, if you match a drummer who already has a soft kick sound with the original AKG D12, you may actually want to dial out some LF to tighten up the sound a little. It is generally considered that around 200-250Hz is potentially ‘muddy’, but you may want to go lower than that. Similarly, boosting anywhere between 2.5-4kHz can help to bring out the snap of the beater hitting the head. The appropriate frequency depends on many variables concerning the sound of the drum, the location of the mic and the sound required.

Are you thinking: “Might it be better to pair the D12 with the hard kick and the D112 with the soft kick to deliver some of the characteristics where each is slightly lacking?” If you are, congratulations! You are starting to think like a real sound engineer, and you’re considering the most appropriate mic for the specific instrument in front of you. For all that, the D12 may still be a good match for the softer kick, if that’s the sound the drummer is aiming for. (More on that a next post.)
 
EQing snare drums

Before we get into the hands-on stuff, he’s a little bit of philosophy, which I’ll explain in terms guitarists can relate to. We six-string types try hard to get the sound coming out of the speakers to match the sound we had in our heads. So if we’ve achieved a mellow jazz sound that would do justice to the playing style of Joe Pass, we don’t expect someone to come along and impose the distortion and phase tones of Eddie Van Halen on us.

Well, despite whatever jokes we may care to make, drummers are musicians too. They often invest a lot of care, time and money in producing the sound they want to hear from their drums and cymbals. So, if their snare has a metallic ring to it, their kick drum sounds round and not especially hard-hitting, or they have a lot of overtones in their toms, the sound engineer should at least have the courtesy to discuss if this is what they are shooting for. A good engineer is an enabler of the artists’ ambitions: it’s not for him or her to make every kit they encounter sound like a set of generic digital samples labeled ‘rock’.

Right, now let’s see if we can get a snare drum sound both you and the drummer can be proud of…

The first problem I face when trying to give advice is the mass of unknown variables: snare drums vary greatly in diameter, depth, shell material, the way they are tuned, the way the drummer hits them, and with what weight of stick. Then there’s the question of how you have chosen to mic the snare. Not just what mic(s) you’ve gone for, but the placement you’ve chosen.

All I can say as a starting point on this – the most important drum in the kit to get right – is that if you’re hearing a mass of nasty overtones though the desk, cut the channel and listen to what you’re hearing through the air. If it’s better than the sound though the desk, you need to ask yourself whether you should back the mic(s) off a bit, or even choose a different mic.

Assuming what you’re hearing through the system is at least as good as the snare in the room, it’s time to consider if there are any remaining resonant frequencies from the snare that will spoil the mix. The easiest way to locate the precise frequency is to boost the mid EQ a lot and then sweep until the unwanted ring is greatly accentuated. Then you can turn the control the other way and cut the offending frequency. If the EQ is parametric and you can adjust the band to a really narrow Q, so much the better.

(Unless you especially like the sound of feedback, you may care to do this while using headphones. Those ringing frequencies can be little demons and you prod them with a stick at your peril.)

While you should definitely have the low pass filter in to keep the thud monsters at bay, it may be that you can cut even higher up the frequency spectrum using a sweep mid. Really it depends on the style of music you’re working with. For a really thick, heavy snare sound, you might want to actually add a bit of a boost around 150Hz.

When you are mixing for an act with a lighter, MOR kind of sound, you probably should be aiming for a snappier snare with less body. You can often achieve that with a gentle cut around 600Hz and/or a bit of a boost around 4kHz, possibly below. If you have any control over Q, broad curves are what you need for subtle enhancement. As for cleaning up the LF, you can start rolling off as high as 500Hz if a snappy snare is in order. (We’re talking more ‘Stand By Your Man’ than ‘Bring Your Daughter To The Slaughter’ at this point.)

What you probably won’t want is any HF boost. There’s really not a lot happening with a snare drum at 10kHz and beyond, so if you start boosting this region, all you’ll get for your efforts is probably increased spill and a nasty sounding hi-hat.

You may be wondering if that’s all I can find to say about getting a good snare drum sound. After all, isn’t it the key drum sound to get right?* Yes it is, but that doesn’t mean you always need to look to the EQ section. There’s a whole array of techniques you can bring to the party, starting with something as simple as adding an appropriate reverb, to quite complicated processor chains that can mimic the sounds on best-selling album tracks within a live context.

At the other end of the scale, if you are amplifying an act where the natural sound each instrument makes is the major priority – I'm thinking perhaps jazz drummer, grand piano and double bass – it may be that you don't even need a dedicated snare mic. The overheads may do everything you need – and all you need to do to them once you have them positioned well is as little as possible!

With a little knowledge and practice, almost any level of sound production is possible, providing you have the equipment and set-up time to carry it off. In the next post, I’ll look at EQ for toms.

* Everything matters in the mix. It's just a question of degree.
 
Back
Top