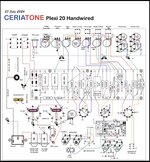
Ceriatone British Style Plexi 20

Can anyone explain to me what these features actually do? These are 3 of the features this amp has that I have no idea what they are or what they are doing. I've watched the video several times and about 5 minutes in he tries to explain the switches on the back, but he fumbles around so much I don't really think he knows what they do. He was saying something about one of these switches make the amp go from 68 plexi/JTM type low gain to louder higher gain and saturation, but that's all I got out of it and I'm not even sure which switch he was talking about.

– Fat switch (V2A cathode capacitor)
– Split/Shared V1 Cathode Switch
– 3 way Negative Feedback switch


There's no manual on the website for this amp, just a layout. I don't know if these amps ship with a manual, I bought my King Kong used so it didn't have one, but there was a download for it on the website.
I bet a schematic could give you some clues. Also, tap the brain trust here. Lots of amp building experience.
 
Can anyone explain to me what these features actually do? These are 3 of the features this amp has that I have no idea what they are or what they are doing. I've watched the video several times and about 5 minutes in he tries to explain the switches on the back, but he fumbles around so much I don't really think he knows what they do. He was saying something about one of these switches make the amp go from 68 plexi/JTM type low gain to louder higher gain and saturation, but that's all I got out of it and I'm not even sure which switch he was talking about.

– Fat switch (V2A cathode capacitor)
– Split/Shared V1 Cathode Switch
– 3 way Negative Feedback switch


There's no manual on the website for this amp, just a layout. I don't know if these amps ship with a manual, I bought my King Kong used so it didn't have one, but there was a download for it on the website.
Other than “they do what they say” I couldn’t tell you how they actually work. I have had the Fat switch which worked well, the Cathode switch I have never had. The NFB on a couple different amps I have had might as well been a sticker, it did nothing. My first couple amps from Nik came with paper manuals, same as on the site just printed out. However none have come with any since. I told him last time we talked to up his game on the manuals and info, he agreed he needs to.
 
Other than “they do what they say” I couldn’t tell you how they actually work. I have had the Fat switch which worked well, the Cathode switch I have never had. The NFB on a couple different amps I have had might as well been a sticker, it did nothing. My first couple amps from Nik came with paper manuals, same as on the site just printed out. However none have come with any since. I told him last time we talked to up his game on the manuals and info, he agreed he needs to.

I guess I'll just have to wait until I get it and see for myself, lol.
 
Can anyone explain to me what these features actually do? These are 3 of the features this amp has that I have no idea what they are or what they are doing. I've watched the video several times and about 5 minutes in he tries to explain the switches on the back, but he fumbles around so much I don't really think he knows what they do. He was saying something about one of these switches make the amp go from 68 plexi/JTM type low gain to louder higher gain and saturation, but that's all I got out of it and I'm not even sure which switch he was talking about.

– Fat switch (V2A cathode capacitor)
– Split/Shared V1 Cathode Switch
– 3 way Negative Feedback switch


There's no manual on the website for this amp, just a layout. I don't know if these amps ship with a manual, I bought my King Kong used so it didn't have one, but there was a download for it on the website.
They make an "All Access" version of the JTM45 now that has a bunch of those circuit change switches. I've looked over the layout diagram and considered adding them to my stock version. My main hesitation is that with the MV and buffered loop, I can already get some amazing tone versatility with the 31 band EQ and a couple of pedals.

Subtle little changes to this or that probably wouldn't be be worth the effort. It'd be nice to try the options and just make some permanent mods for anything that's appealing.
Since yours is coming with, I'd guess you'll try flipping the switches a few times and then just leave them one way or another.

The tone explosion running stereo with the O20H will blow away anything those little switches can do. :coffee2:
 
Last edited:
Fat switch (V2A cathode capacitor)
– Split/Shared V1 Cathode Switch
– 3 way Negative Feedback switch
A retired truck driver’s version:

Looking at the layout, this Fat switch adds a .68 cap that parallels V2A’s 820 ohm cathode resistor. IMO, a .68 cap at this location adds a bunch of gain to the mids and highs, and barely any increase to the lows. I’m actually surprised it’s labeled as a Fat switch instead of a Gain switch.

Split/Shared V1 Cathode switch: I think that when V1 shares its cathode circuit with both inputs, that both volume controls are interactive with each other even with only a single input being plugged into. When V1’s cathode circuit is split, that interactivity is eliminated unless jumper cables are used.

3-way NFB switch: The higher the resistance value is, the less negative feedback is in the output circuit. The three selectable values accordingly to the layout is 49K, 95K, and 127K. More NFB makes the amp sound smoother, cleaner, quieter, and tamer. Less NFB makes the amp more aggressive, gainier, and wilder. Plexi’s generally are loaded up with 47K’s, which is like middle-of-the-road for NFB control. JCM800 2204’s use a 100k NFB resistor. Some amps have no NFB, like some Fender Tweeds and Vox AC’s.
 
A retired truck driver’s version:

Looking at the layout, this Fat switch adds a .68 cap that parallels V2A’s 820 ohm cathode resistor. IMO, a .68 cap at this location adds a bunch of gain to the mids and highs, and barely any increase to the lows. I’m actually surprised it’s labeled as a Fat switch instead of a Gain switch.

Split/Shared V1 Cathode switch: I think that when V1 shares its cathode circuit with both inputs, that both volume controls are interactive with each other even with only a single input being plugged into. When V1’s cathode circuit is split, that interactivity is eliminated unless jumper cables are used.

3-way NFB switch: The higher the resistance value is, the less negative feedback is in the output circuit. The three selectable values accordingly to the layout is 49K, 95K, and 127K. More NFB makes the amp sound smoother, cleaner, quieter, and tamer. Less NFB makes the amp more aggressive, gainier, and wilder. Plexi’s generally are loaded up with 47K’s, which is like middle-of-the-road for NFB control. JCM800 2204’s use a 100k NFB resistor. Some amps have no NFB, like some Fender Tweeds and Vox AC’s.

Thank you very much! :cheers:

Now what the guy in the video said makes more sense. :yesway:
 
Dammit Steve! Now you've gone and done it. You gave me GAS to order the kit version of this. :BH:

Sorry..
ZFrfMx5.gif
 
I agree with everything @syscokid stated with a reiteration that the JTM and JMP were able to jumper cables Volume1 and Volume2 and in that config you can add or subtract which volume you wanted less or more of, keeping in mind each had a slight difference in tone depending if it came with the split or the shared cathode. So the split/shared switch gives you the ability to sound more like each version, JTM or JMP.

With all that in mind it you can also get varied tones using the fat switch with the split/shared switch ON or OFF. In general you'll have access to multiple tones in any config. If it were me I would use the jumpered inputs and play with the various switches before adding any boost pedals in the front but definitely with the FX Loop for reverb and delay and chorus, there are some configs where adding a boost to the FX Loop is also a nice difference. See what the Amp can do without pedals in front first then add what you want. You have the PPIMV so you will have output control to all of it. However all tones will change with PPIMV volume output and this is where using the feedback switch might help keep tone where you want depending on the volume you are at. Also the presence control might have a larger or smaller affect to the to the tone depending on the Volume and feedback switch settings. The boost switch looks like its just a ground lift in the Tone circuit which will provide a louder Send to the FX Loop but with a centered tone boost, you will likely lose some bass when in use.

Once you start adding boost pedals in the front inputs the bright switch setting could be helpful to go from clean to dirty with guitar volume knob.

It is the ultimate built in modded version of a JTM45 type circuit, You will be tweaking it for a long time in each input config until you settle for the tone you use most and you'll know exactly what needs to be tweaked between Single Coil and Humbucker guitars.

My guess is if you are anything like me you will find every switch adds something depending what you are playing. IOW you will take what the amp gives and find cool stuff to do with each setting.

Looks great, good luck, have fun, don't die...lol :beers:
 
By the way, I have been derailed from my own build since March due to a law that went into effect Aug 1st. Because FOMO got the best of me I bought a new pew pew for SHTF. I haven't able to practice because of this heatwave

But now because of you @DirtySteve I may have to derail the derail and go back to my build. I just need a custom rack mount chassis built then I can begin but that is harder to find than it sounds. I'm willing to pay premium pricing for a one off but current chassis makers are not willing to create it for me and I don't have a metal shop.
 
I guess I'll just have to wait until I get it and see for myself, lol.
From other amps on Nik’s site.

SPLIT/SHARED CATHODE switch is to select between the earlier shared cathode (330uF/820 ohms) configuration for V1, to the later split cathode (330uF/820 for V1A, and 0.68uF/2K7ohms for V1B)

NEGATIVE FEEBACK (NFB) is a 3 way switch to select different NFB resistor values: 27K (LEFT), 49K (RIGHT), and No NFB(MIDDLE).
No NFB will give the amp a louder, more gainy characteristics. Wild!

FAT switch revoices the frequency response of the TREBLE control, turning it into a sort of Mid Boost like our OTS series. You’ll notice a thicker, more vocal midrange response with this engaged. Push toggle to the RIGHT to engage.

Don’t know if this is what you want, but…..
 
Thanks for all the explanation. I think this amp is going to be a lot more fun than I thought. :dance:
The PPIMV is a big plus, one you won’t want to be without ever again. Great loop as well and they make a difference if you use them a lot. I make up little 2 wire harnesses with black mini tie wraps, then put red and blue tie wraps on the ends as markers so it’s easy to see we’re they go. Also I use short wires so I don’t have a ton of wire on the floor.
Did you ask Nik about putting in an input that is jumper'd already? I forgot to ask you before, but that would be handy.
 
Great loop as well and they make a difference if you use them a lot. I make up little 2 wire harnesses with black mini tie wraps, then put red and blue tie wraps on the ends as markers so it’s easy to see we’re they go. Also I use short wires so I don’t have a ton of wire on the floor.

That's a good idea. I've never really used an effects loop partly because of all the extra cables. I almost told him to leave it off, but I didn't because I might use it someday. I figured it would be better to have it and not need it, than to someday need it and not have it.
 
I didn't even know to ask that, I figured I'd learn about jumpering when I got it. I've never had a 4 holer.
I use a Y cable adapter for the inputs on my JTM45. One end stays in the high treble channel jack, and I move the other between the high & low jacks on the normal channel depending on the guitar.
 
That's a good idea. I've never really used an effects loop partly because of all the extra cables. I almost told him to leave it off, but I didn't because I might use it someday. I figured it would be better to have it and not need it, than to someday need it and not have it.
Yeah, a good fully equipped foot switchable fx loop brings a lot more versatility to an amp. It can be used effectively even without a pedal plugged into its circuit. If it has enough juice, it can boost the amp’s clean signal a decent amount. Or, lower the overall volume when activated, and when not activated you’ll have whatever volume the rest of the amp is set up with like a solo boost.
 
Yeah, a good fully equipped foot switchable fx loop brings a lot more versatility to an amp. It can be used effectively even without a pedal plugged into its circuit. If it has enough juice, it can boost the amp’s clean signal a decent amount. Or, lower the overall volume when activated, and when not activated you’ll have whatever volume the rest of the amp is set up with like a solo boost.
The Ceriatone buffered loop level is adjustable with a trimmer on the loop board, but I don't think the bypass is foot switchable. (Mine isn't...)
 
That's a good idea. I've never really used an effects loop partly because of all the extra cables. I almost told him to leave it off, but I didn't because I might use it someday. I figured it would be better to have it and not need it, than to someday need it and not have it.
Loops are great if they are good ones. My Carvin amps have switchable loops which are fantastic. You can set up everything you want in the loop, then turn it on all at once with the foot switch. (Maybe Nik can add a loop foot switch if you think it’s something you would use) I use 6’ & 10’ cords so there is no extra wire under foot, 20’ or so for the guitar only. I use the 4 CM with the HX Effects, with my pedal board I made up two separate ones. One is the “drive” board and goes in the front, the other is delay / reverb and whatever which goes in the loop. Makes it very easy to set up and sounds better too. I use two wires with straight ends for the loop and angled ends for the pedal board to keep it narrow and out of the way.
 
Back
Top