Would anyone like to know more about…?

Hats off to you Simon,
You know your stuff and always there to help somebody else

I've tried to get cakewalk up + running on my PC but I'm just stupid I think
Thank you!

When I worked in pro audio sales, people would often say to me: "I know it's a stupid question but…". I'd tell them: "It's not a stupid question. Nothing in your life so far has prepared you for audio technology. You did the smart thing, and asked someone who probably knows the answer to your questions."

You're far from stupid, Bob. Please, just let me know where you get stuck, and I'll try to help.
 
See ya in a few hours, Reaper set up.. with all this new knowledge & inspiration got to see if i can capture something gooder,,,had killer drum idea & got it translated with EZ2. All my tracks color coded,, its vass time !!!... have no clue for lyrics but will happen prob around 6 pm lol might try plug in mania for a change
View attachment 101356
Great to know this is making you feel inspired! It's gone Midnight here. I have some Sunday meals to cook before we meet again, but I'll post again in about 16 hours.
 
Great to know this is making you feel inspired! It's gone Midnight here. I have some Sunday meals to cook before we meet again, but I'll post again in about 16 hours.
Just finished the song...actually felt very relaxed & comfortable... not many plugins just a lot of leveling again. Tried keys for first time, def gonna use them more often
 
I can’t wait to get to mixing levels.
Like, what should be louder than what.
I’ve had some good advice from people. I’m sure there is some kind of “this is how it’s done” rule or guideline
Last post before I go to bed: all the creative decisions are up to you. The methods to help you to make those ideas actually happen are what I hope to share.
 
After wading through pages of the Reaper manual, I started to lose the will to live, so I headed to YT to see if there's a helpful video. Yes there is! Grouping your tracks into Folders is just as easy as creating Stacks in Logic, and this guy shows you how:

Yes sir…he’s a long time Reaper instructional video maker. I link to him often. His stuff is found easily on the Reaper site, and (imo) is neatly catalogued right here. It might save you, and anyone curious about certain tasks, time in finding out about methodologies in Reaper. Apologies for not posting that yesterday.
 
Yes sir…he’s a long time Reaper instructional video maker. I link to him often. His stuff is found easily on the Reaper site, and (imo) is neatly catalogued right here. It might save you, and anyone curious about certain tasks, time in finding out about methodologies in Reaper. Apologies for not posting that yesterday.

Thank you kind Sir! Very useful.

There's a point 59 seconds in where Kenny kinda glosses over the natural question: "How come that button magically leaves only the drums in the Folder? The answer (and the button itself) becomes apparent when you hover your cursor over that region of the Track. To quote: "Cycles whether the track is a track, a folder, or the last track in a folder." In other words, when Kenny clicks twoce, what he's actually doing is telling Reaper that all the tracks after that one do not belong in the folder.

As he goes on to point out, there's a way to specify which tracks you do want in the folder, which seems more intuitive to me.
 
As well as organising my tracks, I like to go through a process I call "housekeeping", because it's not all that rewarding butt the place looks a lot tidier when I've finished. How much housekeeping I need to do depends on how much care went into the project at the track-laying stage, but I'll be listening out for things that don't belong in the finished mix.

The list of possible unwanted sounds can be endless. but includes: the drummer's count in; the bass player swearing at the end, because he didn't think it was a good take; the singer clearing his/her throat; a shed load of extraneous noise from one of the guitar tracks, just before the searing lead solo; three backing singers talking about their night out until they're about half-a-bar from where they come in (that's a real one); a stange clicking noise as the singer opens their mouth; habitual tapping of the strings on the bass where the rests should be… Whatever, it really helps to get rid of anything that shouldn't be there. That's a theme I'll be going back to when we get to EQ.

I also keep eyes and ears open for tracks that have been under-recorded level-wise. When you use Normalise, or just put a gain plug-in at the head of the channel, it always pays to keep the fader levels somewhere either side of "unity gain" (ie, neither cutting or boosting, but at the zero mark) in case you either run out of fader travel, or perhaps run so little level you're in danger of working at 12-bit resolution.

The next bit is slightly more controversial, because it concerns tuning and timing. How much time and effort you are prepared to fixing these issues depends on i) how tight the performers were, ii) the style of music, iii) how much time you've actually got and iv) your skill at making these tiny tweaks. There's also the question of the client's expectations!
 
Right, let's assume we're all ship-shape and ready to do some actual mixing. Where to start? I'll always start with the drums, then add the bass. If those are solid, and you can hear the bass and the kick drum as two separate instruments, you've got the foundation for a good mix.

The two drums that normally do most of the heavy lifting are the kick and the snare, so this is perhaps the point we should talk about the role of EQ, and the power of "subtractive EQ". Typically, the channel EQ on a mixing desk – whether that's physical equipment or software in your DAW – can cut/boost by typically 15dB. To those of us who started with guitar amps that glow in the dark, turning all the controls up to full is probably our starting point. When using a mixer, that's not usually the best approach.

Especially with drums, the most powerful results are to be had between 0dB and -15dB, rather by boosting frequencies.

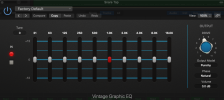
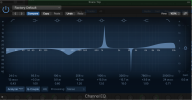
Below are images of a Graphic EQ and a Parametric EQ. If you're new to this, you'll probably recognise the Graphic from Hi-Fis and bass amps. The Parametric might look a bit scary. Later today, I'll show you that one is just a more versatile version of the other, and explain how tuning out "ringing" frequencies on a snare can make massive improvements.

I have to go and cook dinner now!

Graphic.pngParametric.png
 
Just actually tried for once on the mix side of things on a song i wrote that means the world to me.. Had to go play some g-tar between it lol but i like the results. It was a quick take that spontaneously happened,cause we had to leave for FL asap as just got word Granny passed. Its her tribute song & Fam had me read the words at the Funeral. Man so emotional. WW2 vets wife & seeing all the respect from our service men melts ya down.

NOTE: Mesa 50 Cal+ strait in is amazing..gonna hunt for another one
 
Going back to the equalisers, what's the strong point about a Graphic EQ? Well, it's easy to understand and fast to set up. the 'graphic' part comes from the fact that the buttons on the sliders form a graph of the EQ curve we're applying, where volume is one the vertical exis, and frequencies are on the horizontal. What are the weak points about Graphic EQ? We the main one is we've been given 10 frequency centres to play with, meaning that if we wish to address a frequency between those centres, we have to use two sliders, which is going to affect a lot more frequencies than we intended.

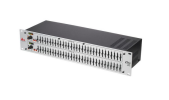
One solution to this is more sliders! Until DSP (Digital Signal Processing) came in, 31-band graphics were standard issue for the purpose of tuning a room for a Concert Touring rig, or similar large-scale Sound Reinforcement system. If you wanted to do this by ear, the key was to boost each band in turn, listening out for frequencies that 'rang', because those are the problem ones that will give you feedback issues.

Then – and this is the key point –you pulled the sliders on the problem frequencies down to 'notch out' the ones you didn't want emphasised. Well, it's the same with EQing a drum kit – for the most part, you need to remove the frequencies you don't want.

In the next bit, I'll explain how we deal with unwanted ringing on snare drums, which will help to illustrate why a Parametric EQ is a more powerful tool for the job than a Graphic.

Screenshot 2024-07-01 at 18.24.44.png
 
If you wanted to do this by ear, the key was to boost each band in turn, listening out for frequencies that 'rang', because those are the problem ones that will give you feedback issues.

Then – and this is the key point –you pulled the sliders on the problem frequencies down to 'notch out' the ones you didn't want emphasised. Well, it's the same with EQing a drum kit – for the most part, you need to remove the frequencies you don't want.
You start each slider at unity right? or do you bottom them out and go from there?
 
@LiveeviL2000 you're correct 'Unity Gain' is always the place to start.

Parametric.png

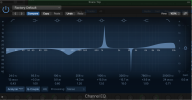
I've reloaded this image, so you don't have to keep scrolling to follow along (user manual writers, please note). Although parametric EQs on old-style analogue console are based on rotary controls – and don't give a lot of clues to less experienced users – this Parametric plug-in is very close to a Graphic in layout. On the horizontal axis, we have the audible spectrum, from 20Hz-20kHz. (Believe me, it's been years since I could hear anything close to 20kHz…) On the vertical axis we have cut/boost to the tune of -15/+15dB.

So far, very much like the traditional Graphic equaliser, but there are two major differences, and they are the key to what makes a Parametric the ultimate EQ tool in many ways.
 
Last edited:
Firstly, If I want to boost a frequency a little higher than 1kHz, or a bit above 3kHz, I can. That's because a Parametric EQ's bands have 'sweep frequency' to allow you to focus in on the exact frequencies you want.

Second, you'll notice that some of the curves are rounded and gentle, while others are really tight and spikey. That's dorwn to the third parameter, 'Q'. I know it sounds like something out of a spy movie, but 'Q' isn't some shadowy figure, it's just the contour we're applying. Those soft curves are more like the tone controls on an amp that only has Treble and Bass, while those really tight spikes are exactly what we need to notching out problem ringing on snares. As we'll see, every Q values has an application.
 
So how do we "ring out" a snare drum? Well, it's much the same process as notching out frequencies in a venue using a Graphic EQ. But a Parametric EQ gives us a couple of real advantages. One is we can go for a super-tight Q value, meaning we're only addressing the specific centre of the offending frequency. The other is we can "sweep" through every frequency in our hunt for the ones we don't want. (In reality, you may as well start around 6kHz though, because the annoying tones are likely to below that frequency.)

I don't want to overload anyone's brain, so I'm only going to use the "bell curves" that affect the mid range frequencies. We can deal with the others another day.


Bell Curves.png
 
With the maximum boost, and the tightest 'Q' you sweep through the frequencies of the snare track, until you find a frequency that is really objectionable. You then reduce the level of your boosted EQ until it is in the -dB range, and keep going all the way to -15dB, if that sounds better to you. Then go to the next EQ band, and repeat the process. In theory, you could use all four mid-bands to notch out ring tones, but it would have to be a really nasty, cheap snare if you had to go that far. I have watched drummers achieve far better results with little stick-on damping pads than I'm going to get at the mix stage!
 
Back
Top