Would anyone like to know more about…?

Very nicely done! I should learn to do the screencast thing myself. May I ask what app/program you used on Mac to capture screen and audio?
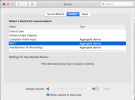
Of course! You can do this for free using OBS. The other thing you need to do is 'aggregate' your audio output, meaning that OBS can share your audio device and thereby record audio and video at the same time. That software is also free.

There is a downside, which I honestly can't remember, but it was stopping me doing something, so I switched back to the Focusrite Saffire as my default audio I/O. Because it's been some time since I did this last, I actually recorded the audio using Audio Hijack, then synced it to the video in Resolve Free.

Screenshot 2024-07-14 at 19.03.15.png
 
Last edited:
Here's the first video. It's pretty basic, but it should hopefully explain a fair bit. I'll write some comentary later.

OK, here's some initial explanation as to why we need to get as much ambient sound ('spill', 'bleed' call it what you will) out of the drum tracks before we do anything else. The three main reasons:

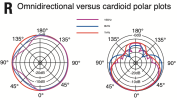
1. It sounds awful! Stage mics nearly always have cardioid directional patterns. The frequency response is nothing like linear on most dynamic mics, and that's on-axis. Onne you get to the side of the mics – 90° off-axis – the story is even worse. We do not want this sound in our mix.

Polar Plots.png

A typical cardioid stage mic is shown on the right. At the front of the mic (0°), the frequency response appears reasonably linear, that is to say 'flat', or uncoloured. By the time you get to 90°, the response is so irregular as to be almost useless for a high-quality music recording.
 
Last edited:
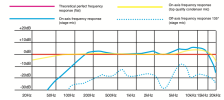
Here's the same story, but illustrated with a frequency plot, rather than a polar plot. If you're not familiar with these plots, just imagine you're looking at the sliders on a Graphic Equaliser. That dotted blue line is how massively irregular the frequency response of the average stage mic is when it picks up sound from the back.

Frequency plot.png
 
2. If we apply EQ and reverb etc to our drum tracks when they are full of unwanted bleed, we're appling to every other instrument as well. So, if we create a massive reverb sound for the snare, say, even the bass guitar is going to get some of the same treatment.

3. Equally, we can't get great vocal, guitar and bass sounds, when there are still crappy versions on the drum tracks. For instance, I'll probably want to re-amp those guitar tracks, so they sound like they're going through massive tube/valve amp stacks, rather than little combos on stage. That's going to be compromised if there are still weedier versions of the same parts floating around on the drum tracks.
 
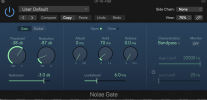
Noise Gate.png

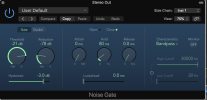
To keep the video brief, I didn't explain why I was making the changes to the Gate, and what effect each control has. (I don't expect you to sit through a 20-minute epic, because it gets boring after a bit.) Working left to right, this is what the various parameters are:

Threshold
determines the level at which the gate opens. Set it too high (ie towards 0dB) and some drum hits will fail to open the gate. Set it too low (ie towards -100dB) and the gate will be open all the time. There is so much spill on the kick drum that, with the Threshold set to -100dB, it sound like the whole mix coming through a very cheap speaker! It's a parameter well worth spending time on.

Reduction determines how far the volume drops when the gate closes. At -100dB the gate acts like an automated mute. Turn the dial up to, say, -8dB, and there is just a subtle pumping effect to the spill. That's not much use for our particular application, but it can be handy when, for instance, you want to reduce the amount of spill into the guitar mic, but not so much that it sounds unnatural. As most of the drum tracks are filled with 'short, sharp, shocks', we can afford to be more brutal!
 
Attack is used to set how quickly the gate responds to the incoming signal, while the Hold value determines how long the gate stays open at a fixed level, and Release is used to adjust the rate at which it closes again. On drums, Attack and Hold setting as fast as 0ms can work well, while the Release need only be long enough not to cut of the small amount of sustain from the drum.

You can safely ignore any other controls on the gate at this stage. In fact, it's very possible that your plug-in doesn't even include them. Later on, I will discuss the Bandpass section, but it is only relevant when using a Side Chain.

Tip – It's worth bearing in mind that dB (decibel) and ms (millisecond), are absolute measurements, and not specific to a particular plug-in. Therefore, if you copy any of the settings you see in this thread to use in your own projects, you should get very similar results.

In general,
I'll try to stick to using plug-in types that all DAW users have access to, in the knowledge that for many forum members, big-ticket software that may only get occasional use is impossible to justify.
 
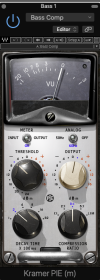
In the spirit of being inclusive, I'd like to point out that the compressor I'm using on every channel doesn't have to be the Kramer PIE by Waves. In fact, I originally used a clone of the dbx 160, but I don't have it any more. I picked the Kramer, because it's a classic design and simple. Copy the Threshold, Decay Time and Compression Ratio to any compressor plug-in, and you too will have a useful tool for helping to keep the incoming level under control.

Kramer PIE.png
 
The live sound guys had mic'd the snare from above and below, which gave me plenty of choice sonically. If the snare needed any unwanted rininging notched out, the guys had already done it for me, so I had a fairly simple job.

Unlike the kick, spill into the mics wasn't too bad. The trouble with putting a mic inside the shell of a kick drum is it acts a bit like a reflector, meaning the ambient sound is usually louder as a result.
 
If you listen while I'm adjusting the threshold of the gates (I'm actually addressing both the highlighted channels simultaneously) there is definitely a point at which the gates are deteriorating the sound of the snare. At that point, I started to back it off a bit, so that the sound opened up. There is no virtue in eliminating every bit of spill, if we make the drums sound bad!

With the compressors, I wanted to get the snare level consistent enough in the mix, but not so compressed it starts to sound lifeless.

Apologies for using the Sonsig reverb, because I know it's something of a specialist tool, but I happen to think it sounds especially great on drums. In truth, you can get a similar sound out of most reverbs. For this one, I was going for a small room ambience, and I'm using an aux mix to a bus because I'll probably want to use it on other drums too. (And maybe even vocals…)

Again, I know the Waves IR-L is a bit of an unusual one, but I chose these plug-ins long before I made the video for you guys, and I wanted something that sounded like a top-quality concert hall, because I was mixing this for the live show footage. Any decent digital reverb should be able to give you a realisric similation of a large concert hall, without you going to the extent of loading impulse responses recorded in actual venues.

Er... That's about it for now.
 
Last edited:
Now we move onto the hi-hat mic. As often happens, there is a lot of bleed into this mic. First off, it's usually pointing towards the snare. Secondly, the mic of choice is a small-capsule condenser – because it has a nice high-frequency response – but that also makes it very efficient at picking up a lot else on stage, from 20Hz-20kHz. As you'll see and hear, EQ is just as important a tool for cleaning things up as the gate…

 
Last edited:
With hindsight, I would have put the EQ in the signal chain before the gate. This would have given the noise gate a lot less to deal with, so allowed me to get more accurate results. Six years ago, I was sent something like two-and-half hours of audio and video to mix and edit. Now I look at it again, I could have done better, but I wanted to get the videos onto YouTube, so everyone who took part had something to remember the day by.

** Detail for another day **

If you take a look at the right-hand section of the gate below, you'll see there's a drop-down menu next to 'side chain', followed by two bandpass filters lower down. I won't get into details now, but the basic concept is this: if you set 'hi-hat' as your side-chain, that's what will make the gate open and close. If you use the Bandpass filters to narrow down the input to the gate, by removing all the irrellevant bleed/spill, it will trigger much more reliably.

The fact the signal to the side-chain of the gate probably sounds like crap doesn't matter at all. It never appears in the mix. It's only there to work the gate. That's really the way to gate the hi-hat, but it takes a bit more work when it comes to 'what's routed to what'.

** See you another day! **


hi-hat gate.png
 
You'll probably be relieved to know this is the last video on mixing drums before we move onto bass, guitar and drums. Yay!

** Full disclosure: I realised at the last minute the track that was supposed to be the mid tom was actually an unused vocal track! When I replaced it with the correct mid tom sound file, it was out of sync with the rest of the song. As it didn't seem to contain any actual tom hits, I just muted it. In fact, there are almost no toms on this song, so what you see in is an illustration of how "I would go about it normally". Masterclass it ain't.**

 
Overheads: as you'll hear, there's a ton of bleed on these. The game, as always, is to reduce the amount of unwanted sound, without making anything sound bad. In theory, you put up overhead mics to capture the cymbals, but the reality is, they pick up almost everything. The snare will always dominate, but the whole band is in there too.

I tried to simplify the trigger to the gates, without compromising the overall sound. So I pulled a lot of low-mid from the OH tracks, then set the gates. The result was fairly clean,

The section on toms is a bit of a joke, because there are almost none! What I hope you'll take away though is the value of using EQ to eliminate those sections of the frequency spectrum you don't need to get the tom sounds you're after. This makes for a much cleaner mix on a recording. In a live situation, it gives you more headroom through the amps and speakers, because they're not having to deal with a bunch of unwanted spill from multiple drum mics.

"Cleanliness is next to godliness." To put it another way, if all the tracks/channels going into your mix contain only the sounds you want to hear, you'll get a much better result.
 
In theory, you put up overhead mics to capture the cymbals, but the reality is, they pick up almost everything. The snare will always dominate, but the whole band is in there too.
This is why I chose, often, to use a small stereo bar, loaded with a couple of small condenser mic’s set in an X pattern. I would place this stand array slightly above, and behind the drummer’s head, mic’s pointed at the top cymbal line, at an appropriate downward angle. I would use his body to effectively shield, and absorb, the snare sound…
 
This is why I chose, often, to use a small stereo bar, loaded with a couple of small condenser mic’s set in an X pattern. I would place this stand array slightly above, and behind the drummer’s head, mic’s pointed at the top cymbal line, at an appropriate downward angle. I would use his body to effectively shield, and absorb, the snare sound…
Excellent advice! That's a very well thought-out strategy.

To be fair to the live crew, they were there to get a result that worked in the hall, rather than the perfect recorded tracks. I was really pleased to get tracks as clean as I did.
 
Apologies for the sections in this video where nothing much seems to be happening. The truth is, my mouse has started to play up, so I was struggling to hit the on-screen buttons at times.

Bass
The first thing I should say is the bass player on this is primarily a guitarist, but she agreed to play bass on some of the numbers, so that they could go ahead with a full line-up. As a result, there are a few minor timing issues. That's hardly surprising, because the right hand has to keep the beat pumping, and it gets to be a stamina issue after a while.

I'm not going to rewrite history by correcting the timing, but I did put a compressor at the start of the signal chain, to keep the bass level in the mix. I started with the 'PA Default', which does a good job of general levelling duties, and I don't even think I tweaked it at all. The only downside to adding the compression was it caused a hum to the bass to get louder when the compressor kicked in. It's not soomething that's going to detract from the overall mix.

Although the bass had a nice tone, I EQ'd it go get more 'thump' and 'snap'.

Onto the guitars. Although it looks as though there are more than two parts, I soon discovered the rest were phantom tracks that had nothing but spill imto open mics that weren't actually used for this song. Auffice to say, I muted all of those!

Rhythm Guitar
As I've noted before, this session used small combo amps. Although this make it easier for the Front of House mixer to get a good sound balance (whereas a super-loud backline leaves you very little room for manouvre, unless you make the whole band painfully loud…), it gave me the task of making the amps sound much bigger in the mix. For the video, I kept it fairly subtle, so it was a fair documant of the original event. For this mix, I'm reamping the rhythm guitar through a Poulin LE456 plug-in, which you can get for free here: PLUGINS4FREE

I mainly used the EQ to cut out areas of the frequency range that were not part of the guitar signal, just general bleed from other instruments on stage (yet another area where superloud backline makes the job FoH even harder), because you can expect the engineer to keep track pof every mic that needs to be muted when the line-up is changing with every number).

That tight notch at 1.380kHz is my attempt to reduce string noise. Adding all that drive made the scrapes and 'eek' sounds from the wound strings leap out.
 
Back
Top