You are using an out of date browser. It may not display this or other websites correctly.
You should upgrade or use an alternative browser.
You should upgrade or use an alternative browser.
Modified V Build
- Thread starter Dewesq55
- Start date


OP
Dewesq55
Well-Known Member
You ARE doing something. Most people (we are just a all segment) would do nothing at all. What you are doing is very brave. I have built 3 and 2 half guitars all from scratch. This is not that brave. But I'm glad you are appreciating my build thread. I promise there will be more. This is all @RVA 's fault, BTW.Very interesting, very interesting indeed. Awesome project, man...
And, here I think I'm doing something getting different tuners and possibly pickups for The Green Slime - lol...
OP
Dewesq55
Well-Known Member
Truss rod day! I was going to use a StewMac HotRod 2way adjustable truss rod, but the neck is pretry thin and I was worried that I didn't have enough wood for the 7/16" channel rout at the thin end. So I decided to do a "traditional" curved truss rod. I have done them before and have routed the channel using a hand held router or Dremel router base with a curved base added to follow curved rails mounted to the top of the neck in order to rout the curved channel needed to load the truss rod. I was looking for a better way and came up with this jig to let me use my rails on the router table:

It's a length of 1 1/4" dowel which I ripped in half with the table saw. I then used a hole saw to cut a corresponding semicircle in one edge of a piece of melamine shelving and mounted the split dowel into the shelf with counter sunk screws. I drilled a series of overlapping holes in the top of the dowel with a 5/8" forstner bit. This will let me move the fence in and out to get the bit lined up correctly. I then just clamped the shelf with the dowel attached to my main router fence. I had to add a piece of supplemental fence due to an error in planning. The supplemental fence (wood piece in the pic) is attached with double sided tape.
Now when I run the neck with the rails attached over the dowel piece, the rounded dowel follows the curve in the rails and raises and lowers the piece onto the bit, making a curved channel the same as the curve in the rails:

I took video of the whole channel routing process which I will edit down and try to post at a later date.
Here is a pic of the truss rod installed and the fillet not installed:

And here's the rod with the fillet pressed into place but not glued. Yes, thats my blood on the neck:

It's a length of 1 1/4" dowel which I ripped in half with the table saw. I then used a hole saw to cut a corresponding semicircle in one edge of a piece of melamine shelving and mounted the split dowel into the shelf with counter sunk screws. I drilled a series of overlapping holes in the top of the dowel with a 5/8" forstner bit. This will let me move the fence in and out to get the bit lined up correctly. I then just clamped the shelf with the dowel attached to my main router fence. I had to add a piece of supplemental fence due to an error in planning. The supplemental fence (wood piece in the pic) is attached with double sided tape.
Now when I run the neck with the rails attached over the dowel piece, the rounded dowel follows the curve in the rails and raises and lowers the piece onto the bit, making a curved channel the same as the curve in the rails:
I took video of the whole channel routing process which I will edit down and try to post at a later date.
Here is a pic of the truss rod installed and the fillet not installed:
And here's the rod with the fillet pressed into place but not glued. Yes, thats my blood on the neck:
Last edited:
OP
Dewesq55
Well-Known Member
I hope not to disappoint, but the plan is to do a tobacco sunburst. I already have a plain mahogany slab guitar, so I am planning something different.It's coming along. Cool thread to follow. Finish wise I vote something that just brings the natural wood and grains out...
bea
AmBASSador of the F Clef
Tobacco sunburst on "red" wood?I hope not to disappoint, but the plan is to do a tobacco sunburst. I already have a plain mahogany slab guitar, so I am planning something different.
I would try this on a rest piece. The yellow/amber might look different from what You expect.
OP
Dewesq55
Well-Known Member
Of course I will test it, but I expect ir to come our something like this:Tobacco sunburst on "red" wood?
I would try this on a rest piece. The yellow/amber might look different from what You expect.

I think the key is to use amber, not yellow.
OP
Dewesq55
Well-Known Member
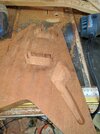
It has ears! I actually spent most of my shop time today tidying up and organizing. Hence, didn't get too much done. I did some work at the truss rod access point and then glued on the ears. The ears were cut from the headstock portion of the first neck blank (the one that got butchered) so they have the same grain orientation as the rest of the headstock.

OP
Dewesq55
Well-Known Member
So, it now has an actual V style headstock and the truss rod fillet is glued up:

But just so you dont think everything is just "oh so perfect" in the world of amateur guitar building, the truss rod nut access cavity, where the headstock meets the neck, was almost through to the back of the neck (you could see light if you held it up.) This was the result of my taking a bit too much wood off on the bottom of the neck where it meets the back of the headstock due to over-aggressive bandsawing. So I had to add this piece on to add some structure. It will have to be shaped into some variety of volute after its dried.

But just so you dont think everything is just "oh so perfect" in the world of amateur guitar building, the truss rod nut access cavity, where the headstock meets the neck, was almost through to the back of the neck (you could see light if you held it up.) This was the result of my taking a bit too much wood off on the bottom of the neck where it meets the back of the headstock due to over-aggressive bandsawing. So I had to add this piece on to add some structure. It will have to be shaped into some variety of volute after its dried.
Last edited:

OP
Dewesq55
Well-Known Member
That's really very nice. Thanks.Looking like a V!
This thread is so awesome. look forward to the updates.
I think.....It's art....friggen art!
RVA
Ambassador
Sure is!I think it's shaping up nicely: