Broken/cracked Headstock repair

Dewesq55

Well-Known Member
Country flag
So it's time to repair the headstock on my mahogany slab double cutaway that I posted the picture of in the "Ouch" thread. I am using hot hide glue. RVA asked me to post some pics of the setup so here goes:

"Glue pot" setup using a sous vide immersion circulator to maintain a consistent proper temperature. You can see some of the implements in the pot keeping warm:
IMG_20161213_141715-1496x2000.jpg

Hot hide glue liquified and ready to use:
IMG_20161213_141726-1496x2000.jpg

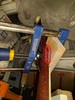
Here's a full shot and some close ups of my clamping setup for the guitar itself. It's clamped upside down since the bottom of the crack is "above" the open end. This will allow gravity to pull the glue down into the bottom of the crack. I'm working in my basement since my shop is too cold, so excuse the clutter:
IMG_20161213_142523-1496x2000.jpg
IMG_20161213_142534-1496x2000.jpg
IMG_20161213_142542-1496x2000.jpg

And here's a pic of the crack with a little wedge stuck in it to ooen it ti allow the glue ti go all the way in:
IMG_20161213_142749-2244x3000.jpg
 
Get in there with a hairdrier to make all the wood good and hot before you put the glue in. It will take time for the glue to penetrate, and you don't want it turning to jelly before your clamps are on.
 
well i see a clamp mid neck to it looks like besides the headstock.or is that just to hold it
 
Looking very clean!!
I had a damp paper towel pad in a ziploc bag keeping warm in the pot. I immediately wiped off all the squeesout I could get to. You can see a few white flecks of dried hide glue spray from the syringe on the neck just above the headstock.
 
Get in there with a hairdrier to make all the wood good and hot before you put the glue in. It will take time for the glue to penetrate, and you don't want it turning to jelly before your clamps are on.

I planned to, but I'll be damned if I can find what SWMBO did with the hair dryer so I used the hot lamp (another Dan Erlewine trick.) I didnt really need it though. The whole thing, from a flush with thinned glue, to squirting the full strength stuff in from a syringe to clamped up was less than a minute. In prepping, I superglued my wood headstock face caul wrapped in wax paper to the the fixed jaw of one of the clamps. That way I didn't have to fumble with it when it came time to clamp.
 
I planned to, but I'll be damned if I can find what SWMBO did with the hair dryer so I used the hot lamp (another Dan Erlewine trick.) I didnt really need it though. The whole thing, from a flush with thinned glue, to squirting the full strength stuff in from a syringe to clamped up was less than a minute. In prepping, I superglued my wood headstock face caul wrapped in wax paper to the the fixed jaw of one of the clamps. That way I didn't have to fumble with it when it came time to clamp.

Looked like it all glued up perfectly. Can't wait to see how it turns out.
 
In prepping, I superglued my wood headstock face caul wrapped in wax paper to the the fixed jaw of one of the clamps. That way I didn't have to fumble with it when it came time to clamp.

That's a pretty neat idea.

Looking forward to the result when you pull the clamps off.
 
I had a Les Paul Deluxe someone two headstock cracks and a chunk out of the neck they filled it with bondo and screwed it together
Used a pressure cooker with a hose to heat up the wood then hide glued it then carved out the bondo and grain matched the neck wood
I had to respray the work you can't tell it was broken 21 hours later. I deleted the photos all but this one.


1973 Les Paul Deluxe 001.JPG
 
I had a Les Paul Deluxe someone two headstock cracks and a chunk out of the neck they filled it with bondo and screwed it together
Used a pressure cooker with a hose to heat up the wood then hide glued it then carved out the bondo and grain matched the neck wood
I had to respray the work you can't tell it was broken 21 hours later. I deleted the photos all but this one.


View attachment 708
Yep, it really doesn't show.;)
 
Well, I pulled the clamp off today. The repair seems very solid so far. The squeeze out on the headstock face and in the tuning peg holes was easy to get rid of. I am going to let it sit unstrung until Saturday. After that, I will post pix.
 
Back
Top