L.P. Shielding

steveb63

Ambassador of the Capacitor
Country flag
Well brother's,

After chewing everyone's ear and derailing another bro's thread I decided to shield my L.P.

If this goes well, my Johnson is next. (never get tired of that joke).

Received my copper foil from Antique Electronics, and I'm off to the workshop this weekend.

Oh paging @Robert Herndon and company, hope y'all don't mind my questions over the next couple of days, because I have questions lol.

Please be patient, and remember "There are no stupid questions- just stupid people. I'm raising my hand now!

Thanks in advance everyone.
 
It's 2" wide, I figure to be doing a little bit of custom cutting.

I should be o.k. on that area, at least that's what I'm saying on Tues. If you catch my drift?

Should be a fun project, I like tearing my guit down. Get to know my tools inside and out.
 
Well brother's,

After chewing everyone's ear and derailing another bro's thread I decided to shield my L.P.

If this goes well, my Johnson is next. (never get tired of that joke).

Received my copper foil from Antique Electronics, and I'm off to the workshop this weekend.

Oh paging @Robert Herndon and company, hope y'all don't mind my questions over the next couple of days, because I have questions lol.

Please be patient, and remember "There are no stupid questions- just stupid people. I'm raising my hand now!

Thanks in advance everyone.

It ain’t too tough to do.

I completely shielded my LP Studio with copper tape.

Just be patient!
 
Overlap the tape and push down hard. I've tried to do it in one piece, it's impossible. Shield the back of the cover so the shielding contacts the shielding of the cavity (Faraday cage). I run a wire from the shielding to the back of the common ground pot. YouTube has a gazillion videos. The more you do it, the neater it gets.
 
Last edited:
I'm so glad I never run into this humming/buzzing problem. None of my guitars are shielded and I've never had an issue...

If you have single coils, you have just gotten used to the 60 cycle hum most likely.

It's super common, especially with older, vintage instruments, notably the un-shielded Gibson's of the 50's and 60's. We did not have all the stray microwave signals and EFI/RMI present in our atmosphere back in the 50's and 60's, so a lack of shielding wasn't an issue. I've experienced some Gibson pickup problems, and I have replaced the pickups to cure the anomaly, but the biggest issue I see here in SoCal is two-way radio, cell phone and FM radio station transmissions being transmitted through the guitar and amplifier combination.

The problem becomes a "bigger deal" if the meter is running - at upwards of $120.00/hour - and the engineer can't pull enough interference off a track without affecting the character of the original recording. Even the "loaner" guitar I have here for students - a 3/4 scale Ibanez - is full shielded for the same reasons.
 
Well brother's,

After chewing everyone's ear and derailing another bro's thread I decided to shield my L.P.

If this goes well, my Johnson is next. (never get tired of that joke).

Received my copper foil from Antique Electronics, and I'm off to the workshop this weekend.

Oh paging @Robert Herndon and company, hope y'all don't mind my questions over the next couple of days, because I have questions lol.

Please be patient, and remember "There are no stupid questions- just stupid people. I'm raising my hand now!

Thanks in advance everyone.

Here's the method I use. perhaps it will help you...

When finished, you should have a nice, 'patchwork quilt' look to the cavity.
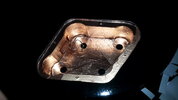
Cavity Les Paul.jpg

On a Les Paul, I start by taking a section of paper and covering each cavity. I then press down to impart a ridge in the paper that matches the outline of the cavity. I will then cut along the indentation and set it aside. In your case with 2" wide tape, I will lay the paper across the face of the tape and trace the outline. Two pieces can be overlapped to cover the bottom of the control cavity. Once these are cut, I apply them to the bottom of the cavity and press them down with a wooden dowel, or a wooden spoon.

Next, I will cut strips of tape - rough;t 1/4" wide - and apply them into the radius between the floor and wall of the cavity. A dowel or wooden spoon works great here as you can roll it along the transition and press the tape into place. Don't sweat a tear in the tape. Just patch the tear and move forward.

For the walls of the cavity, I again make a paper template and transfer that to my tape. I cover the walls in 4 long sections, but the longer the tape, the harder it is to handle when the backing is removed, so shorter sections are fine.

For the top, again a paper template is useful and eliminates waste. I sometimes shield 4-5 guitars a week, so I try to avoid waste at every turn and get the guitars done as quickly as possible.

Now, when I first started doing this, I used a different approach that made the tape easier to handle. Long sections of tape are tough to handle as they want to roll up on you. I will describe this method. It's the method I recommend for beginners.

With 2" tape (any width can be used but 2" is used here because that's the width you are using) cut a section 2" long. Apply that to the middle of the cavity. Cut another. Apply it with about a 25% overlap. Then another and another, working your way across the cavity and up the walls of the cavity. It doesn't matter how many little sections you use. As long as they overlap, the Faraday effect will be complete.
 
Back
Top