I recently acquired a little U.S. made Peavey Mantis from eSGEe.
An odd little beast with an 80's kinda attitude and look.

Cute as it was, it was lacking the refinements that would make it a gigworthy instrument.
It had a Stratish kind of trem on it that just kinda sucked.
And the single pickup had a novel way of going from a bucker to a single coil with the tone knob but it didn't inspire me.
So with a sheet of three ply pickguard material in hand I set out on a mission to transform this humble little beast into something I would enjoy.
I was going to Floyd it.
But before I could do anything fun I discovered that one of the mounting stud bushings would have been partway in the route for the wiring.
So I made a hardwood plug for the route & glued it in place.


So while I was still trying to get this Floyd in the right place I also found out that the Floyd studs would be edging into the pickup route.
Great! So I pondered this over a few beers and came up with a brilliant solution.
I moved the floyd back 1/4" & located the studs into solid wood. This gooched my scale length but got the Floyd located.
Then took the same 1/4" and cut it off the heel of the neck, leaving the last fret overhang, just like this pic.
.jpg")
I now had the scale length back in spec.
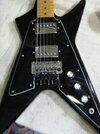
Woohoo, lets sink that Floyd into the body.

A little satin black paint to clean things up.
I worked out a pickguard design on a piece of cardboard from a 24 pack of beer.

Then that sheet of pickguard material that I had got called into play. I used the cardboard as a template and transferred it to the blank sheet.
Cut it out and beveled the outside edges.


Then the body got a swimming pool route because at this point I still hadn't decided on which pickups or how many.
Also enlarged the control cavity at this time.

However I've reached my limit on pics, so continued on page 2.
An odd little beast with an 80's kinda attitude and look.
Cute as it was, it was lacking the refinements that would make it a gigworthy instrument.
It had a Stratish kind of trem on it that just kinda sucked.
And the single pickup had a novel way of going from a bucker to a single coil with the tone knob but it didn't inspire me.
So with a sheet of three ply pickguard material in hand I set out on a mission to transform this humble little beast into something I would enjoy.
I was going to Floyd it.
But before I could do anything fun I discovered that one of the mounting stud bushings would have been partway in the route for the wiring.
So I made a hardwood plug for the route & glued it in place.
So while I was still trying to get this Floyd in the right place I also found out that the Floyd studs would be edging into the pickup route.
Great! So I pondered this over a few beers and came up with a brilliant solution.
I moved the floyd back 1/4" & located the studs into solid wood. This gooched my scale length but got the Floyd located.
Then took the same 1/4" and cut it off the heel of the neck, leaving the last fret overhang, just like this pic.
I now had the scale length back in spec.
Woohoo, lets sink that Floyd into the body.
A little satin black paint to clean things up.
I worked out a pickguard design on a piece of cardboard from a 24 pack of beer.
Then that sheet of pickguard material that I had got called into play. I used the cardboard as a template and transferred it to the blank sheet.
Cut it out and beveled the outside edges.
Then the body got a swimming pool route because at this point I still hadn't decided on which pickups or how many.
Also enlarged the control cavity at this time.
However I've reached my limit on pics, so continued on page 2.


")